Hypervisor Development in Rust Part 1
Updated in 2024

Figure: Red Pill and Blue Pill (Wikipedia: Red pill and blue pill)
Introduction#
In the ever-evolving field of information security, curiosity and continuous learning drive innovation. This blog series is tailored for those deeply engaged in experimental projects, leveraging Rust’s capabilities to push the boundaries of what’s possible. The focus on Rust, after exploring various programming languages, has led to the creation of several cutting-edge projects that are highlighted here.
One such project is the Windows UEFI Blue Pill Type-1 Hypervisor in Rust (Codename: Illusion), which exemplifies the advanced use of virtualization technology for security research. Additionally, the Windows Kernel Blue Pill Type-2 Hypervisor in Rust (Codename: Matrix) represents another significant innovation.
Interest in hypervisor development was sparked by the increasing use of virtualization technology in malware research and game hacking, domains that have seen significant innovation due to the availability of hypervisor solutions. These projects have lowered the barrier of entry, enabling more widespread use of hypervisors in both malware research and game hacking to bypass anti-cheat mechanisms. This trend, combined with other notable projects like the Windows UEFI Bootkit in Rust (Codename: RedLotus) and the Windows Kernel Rootkit in Rust (Codename: Eagle), naturally led to further exploration of the potential of hypervisors.
The ongoing cat-and-mouse game between malware authors and Anti-Virus and Endpoint Detection and Response (AVs and EDRs) systems mirrors the battle between game hackers and anti-cheat systems. With hypervisors becoming a popular tool for evasion, anti-cheat systems have adapted by focusing on generic virtualization detections, such as timing-based attacks.
While the infosec community continues to rediscover malware techniques that game hackers have used for years, these hackers often employ more advanced and less commonly discussed methods. These techniques, often obtained through reverse engineering anti-cheats or driven by a passion for gaming and research, include hypervisor development, Direct Memory Access (DMA) attacks, and attacking Hyper-V (often on the allow list of security software), as well as leveraging UEFI bootkits to inject tools and gain an advantage in games. These sophisticated techniques can also be abused by malware authors. As virtualization-based security (VBS) becomes more prevalent, with features like Hyper-V’s Virtual Trust Level 1 (VTL1) and Secure Kernel, it won’t be long before these methods appear in the wild. Technologies like Intel VT-d (IOMMU) can help prevent DMA attacks by restricting DMA access to specific memory regions, while Intel VT-rp can prevent EPT remapping attacks, providing robust protection against these advanced techniques.
In this blog series, we will explore the technical details of hypervisor development, starting with the basics and gradually progressing to more advanced topics. We will cover concepts like hypervisor-assisted hooking, memory virtualization using Extended Page Tables (EPT), reverse engineering and debugging obfuscated software, and various detection and mitigation techniques used in the field. Additionally, advanced techniques like Intel Processor Trace (PT) and how hypervisors can enhance malware research and reverse engineering efforts will also be examined.
Join us as we navigate the fascinating world of hypervisors, armed with Rust, to uncover the secrets of virtualization and its role in security research.
Introduction to Hypervisors#
This article covers the development of the Windows UEFI Blue Pill Type-1 Hypervisor in Rust (Codename: Illusion) and the Windows Kernel Blue Pill Type-2 Hypervisor in Rust (Codename: Matrix). We will utilize the x86 crate and its documentation, which help simplify the code. While these hypervisors are blue-pill (offensive security), they can easily be converted for red-pill (defensive security), fuzzing, reverse engineering/debugging, and other purposes since the fundamentals remain the same.
Hypervisor development is processor-specific, but once we understand the fundamentals, it becomes easier to create hypervisors for other processors. We will start with Intel Virtualization Technology (Intel VT-x) hypervisor development and may eventually cover AMD Virtualization (AMD-V), also known as AMD Secure Virtual Machine (SVM).
What is a Hypervisor?#
A hypervisor, also known as a virtual machine monitor (VMM), is software, firmware, or hardware that creates and runs virtual machines (VMs). The physical machine running the hypervisor is called the host, while the VMs are called guests. The hypervisor provides a virtual operating platform for guest operating systems and manages their execution.
What Can Hypervisors Be Used For?#
Hypervisors have a wide range of applications, including:
- Security Solutions:
- Fuzzing: Testing software by providing invalid, unexpected, or random data inputs.
- Anti-Cheat / Anti-Virus / Endpoint Detection and Response (EDR): Protecting against unauthorized software and ensuring system security.
- Virtualization-Based Security (VBS): Utilizing features like Secure Kernel to enhance system protection.
- Server Consolidation / Security Isolation: Running multiple server environments on a single physical machine to optimize resource usage and enhance security.
- Offensive and Defensive Research:
- Malware Research: Studying malicious software in a controlled environment.
- Red Pill / Blue Pill Techniques: Using hypervisors for offensive (blue pill) and defensive (red pill) security applications.
- Game Hacking: Using hypervisors to bypass anti-cheat mechanisms in games.
- Reverse Engineering / Debugging: Analyzing software to understand its functionality, especially obfuscated software.
Types of Hypervisors#
Type 1 vs. Type 2 Hypervisors#
- Type 1 Hypervisors: Run directly on the hardware, with the hypervisor operating in VMX root mode and the guest OSes in VMX non-root mode. Examples include VMware ESXi, Microsoft Hyper-V, and Proxmox.
- Type 2 Hypervisors: Run on a host OS, with the host OS operating in VMX root mode and the guest OSes in VMX non-root mode. Examples include VMware Workstation, KVM, and Oracle VirtualBox.
Full-Fledged vs. Pass-Through Hypervisors#
- Full-Fledged Hypervisors: Offer complete virtual machines. Examples: VMware, Hyper-V.
- Pass-Through Hypervisors: Only virtualize existing CPUs and MMU. Examples: SimpleVisor, Matrix, Illusion.
UEFI-Based vs. Kernel Module-Based Pass-Through Hypervisors#
| Type | Advantages | Disadvantages |
|---|---|---|
| UEFI-Based | Greater control of the system, more stealth, cross-platform by design, easier to understand VT | Limited OS interaction, requires system reboot for installation |
| Kernel Module-Based | Easier to develop and debug, no reboot required, easier OS interaction | Limited system control, more detectable, constrained by OS security policies |
Virtual Machine Architecture#
Virtual Machine Monitor (VMM)#
A VMM serves as a host and has complete control over the platform’s processor(s) and other hardware. It allows guest software to run directly on a logical processor by providing an abstraction of a virtual processor, maintaining control over I/O, interrupt handling, physical memory, and processor resources.
Guest Software#
Guest software runs inside a VM controlled by a VMM or hypervisor. Each VM supports an OS stack and application software as a guest software environment. Each VM runs independently, with a standard interface to the platform’s hardware resources.
Introduction to Virtual Machine Extension (VMX) Operation#
VMX operation is a mode that allows a Virtual Machine Monitor (VMM) to control transitions between the host’s standard operating mode and the guest’s virtualized mode. The processor’s virtualization technology supports these transitions, enabling efficient control and isolation of virtual machines.
VMX Root and Non-Root Operation#
VMX operation involves two modes:
VMX Root Operation:
- The VMM runs in this mode with full control over the processor, executing new VMX-specific instructions and controlling the execution environment for guest operating systems.
- The host system operates in VMX root mode.
VMX Non-Root Operation:
- Guest software runs in this mode with restricted behavior to facilitate virtualization. Certain instructions and events cause VM exits, handing control back to the VMM.
- The guest system operates in VMX non-root mode, ensuring it cannot interfere with the VMM or other guests.
VMX Transitions#
VMX transitions are essential for switching between VMX root and non-root modes:
- VM Entries: Transitions from VMX root to VMX non-root, allowing guest software to run.
- VM Exits: Transitions from VMX non-root back to VMX root, returning control to the VMM.
Control and Isolation#
VMX operation provides robust mechanisms for controlling and isolating guest software:
- VMX Instructions: Available in VMX root mode, these instructions manage VMX transitions and control the execution environment of guest software.
- Restricted Behavior in VMX Non-Root Operation: Ensures guest software cannot access or modify critical system resources directly, maintaining the security and stability of the virtualized environment.
Privilege Levels#
VMX operation supports running guest software at its original privilege level (CPL 0), simplifying the development and management of virtualized environments while maintaining integrity and isolation.
Life Cycle of Virtual Machine Monitor (VMM) Software#
VM ENTRY and VM EXIT#
These low-level hardware operations allow the VMM to enter and leave the execution mode of VMs. Other operations, such as VMXON and VMXOFF, enable and disable VMX operation, respectively.
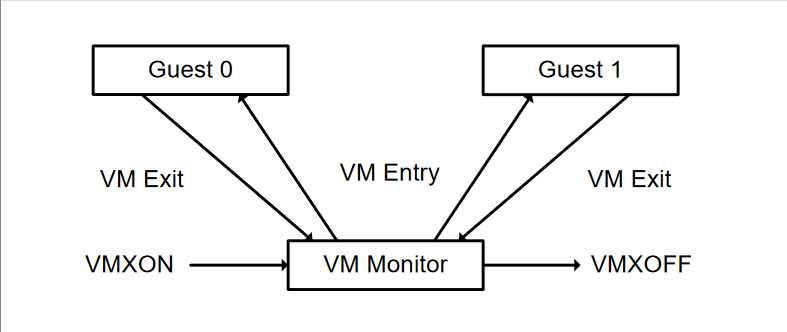
Figure: Interaction of a Virtual-Machine Monitor and Guests (Intel® 64 and IA-32 Architectures Software Developer’s Manual: 24.4 LIFE CYCLE OF VMM SOFTWARE)
- Entering VMX Operation: The VMM enters VMX operation by executing a VMXON instruction.
- VM Entries: The VMM uses VM entries to launch virtual machines (VMs) using instructions like VMLAUNCH and VMRESUME.
- VM Exits: These instructions transfer control back to the VMM, allowing it to handle operations and then return to the VM.
- Exiting VMX Operation: The VMM eventually exits VMX operation by executing the VMXOFF instruction.
Virtual-Machine Control Structure (VMCS)#
A VMCS is used by the VMM to manage and control the execution of virtual machines. It contains the VM’s state, settings for the virtual processor, and the mapping between virtual and physical resources. Setting up the VMCS requires understanding several prerequisites, which we will cover in detail before diving into the actual setup process.
VMCS Instructions#
- VMPTRST: Read the VMCS pointer.
- VMPTRLD: Load the VMCS pointer.
- VMREAD: Read from the VMCS.
- VMWRITE: Write to the VMCS.
- VMCLEAR: Clear the contents of the VMCS.
- VMXON: Enter VMX operation.
- VMXOFF: Exit VMX operation.
- VMLAUNCH: Launch a VM.
- VMRESUME: Resume a VM.
- VMEXIT: Exit a VM, returning control to the VMM.

Figure: States of VMCS X (Intel® 64 and IA-32 Architectures Software Developer’s Manual: 24.5 VIRTUAL-MACHINE CONTROL STRUCTURE)
Discovering Support for Virtual Machine Extension (VMX)#
Before developing a hypervisor, it’s crucial to verify if the CPU is Intel (“GenuineIntel”) and supports VMX (Virtual Machine Extension). This verification can be done using the CPUID instruction, which reveals information about the processor’s features.

Figure: Information Returned by CPUID Instruction (Intel® 64 and IA-32 Architectures Software Developer’s Manual: 24.6 DISCOVERING SUPPORT FOR VMX)
CPUID EBX, ECX, and EDX Register Layout#
To identify if the CPU vendor is Intel, refer to the following layout for the CPUID registers when EAX is set to 0. This will return the ASCII string “GenuineIntel” in the EBX, ECX, and EDX registers:
CPUID EBX, ECX, and EDX Register Layout:
EBX: "Genu"
ECX: "ntel"
EDX: "ineI"
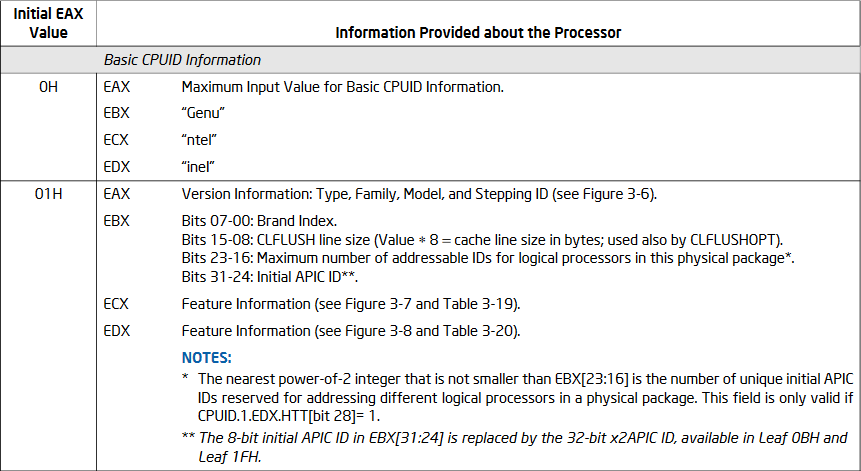
Figure: Information Returned by CPUID Instruction (Intel® 64 and IA-32 Architectures Software Developer’s Manual: Table 3-17. Information Returned by CPUID Instruction)
CPUID ECX Register Layout#
To visualize the required settings for checking VMX support, refer to the following diagram for the CPUID register, specifically focusing on the ECX register when EAX is set to 1:
CPUID ECX Register Layout:
| 31-6 | 5 (VMX) | 4-0 |
|  ... |    1    | ... |

Figure: Feature Information Returned in the ECX Register (Intel® 64 and IA-32 Architectures Software Developer’s Manual: Table 3-19. Feature Information Returned in the ECX Register)
Checking for VMX Support in Rust#
This code checks if the CPU is from Intel and supports VMX operation by using the CPUID instruction.
/// Verifies the CPU is from Intel.
///
/// # Returns
///
/// Returns `Ok(())` if the CPU vendor is GenuineIntel, otherwise `Err(HypervisorError::CPUUnsupported)`.
fn has_intel_cpu() -> Result<(), HypervisorError> {
    let cpuid = x86::cpuid::CpuId::new();
    if let Some(vi) = cpuid.get_vendor_info() {
        if vi.as_str() == "GenuineIntel" {
            return Ok(());
        }
    }
    Err(HypervisorError::CPUUnsupported)
}

/// Checks for Virtual Machine Extension (VMX) support on the CPU.
///
/// # Returns
///
/// Returns `Ok(())` if VMX is supported, otherwise `Err(HypervisorError::VMXUnsupported)`.
fn has_vmx_support() -> Result<(), HypervisorError> {
    let cpuid = x86::cpuid::CpuId::new();
    if let Some(fi) = cpuid.get_feature_info() {
        if fi.has_vmx() {
            return Ok(());
        }
    }
    Err(HypervisorError::VMXUnsupported)
}
Explanation of the Rust Code#
- Function:
has_intel_cpu():- Creates a new instance of the CPUID structure.
- Checks if the CPU vendor string matches “GenuineIntel” by examining the EBX, EDX, and ECX registers when EAX is set to 0.
- Returns
Ok(())if the vendor is Intel, otherwise returns an error indicating unsupported CPU.
- Function:
has_vmx_support():- Creates a new instance of the CPUID structure.
- Checks if the CPU supports VMX by examining the VMX bit (bit 5) in the ECX register when EAX is set to 1.
- Returns
Ok(())if VMX is supported, otherwise returns an error indicating unsupported VMX.
Enabling and Entering VMX Operation#
Detailed Steps to Enable VMX Operation#
Set CR4.VMXE (Enable VMX in Control Register 4):
- The
CR4register controls several CPU operations. To enable VMX, we need to set bit 13 (VMXE), which allows VMX instructions to be executed.
CR4 Register Layout:
| 31-14 | 13 (VMXE) | 12-0 | | ... | 1 | ... |- Bit 13 (VMXE): This bit must be set to
1to enable VMX operation.
- The
Configure IA32_FEATURE_CONTROL MSR:
- The
IA32_FEATURE_CONTROLModel-Specific Register (MSR) must be configured to permit VMX operations. This register plays a critical role in controlling the execution of the VMXON instruction and ensuring secure VMX operation.
IA32_FEATURE_CONTROL MSR Layout:
| 63-3 | 2 (VMXON_OUTSIDE_SMX) | 1 (VMXON_IN_SMX) | 0 (Lock Bit) | | ... | 1 | 1 | 1 |- Bit 0 (Lock Bit): Locks the MSR to prevent further changes until a system reset. If this bit is not set, executing VMXON will cause a general-protection exception. This lock ensures that VMX settings are secure and immutable once configured.
- Bit 1 (VMXON_IN_SMX): Allows execution of VMXON in SMX (Safer Mode Extensions) mode. If not set, executing VMXON in SMX mode causes a general-protection exception. SMX mode provides a more secure environment for VMX operations.
- Bit 2 (VMXON_OUTSIDE_SMX): Allows execution of VMXON outside of SMX mode. If not set, executing VMXON outside SMX mode causes a general-protection exception. This is essential for enabling VMX in standard operational environments.
- The
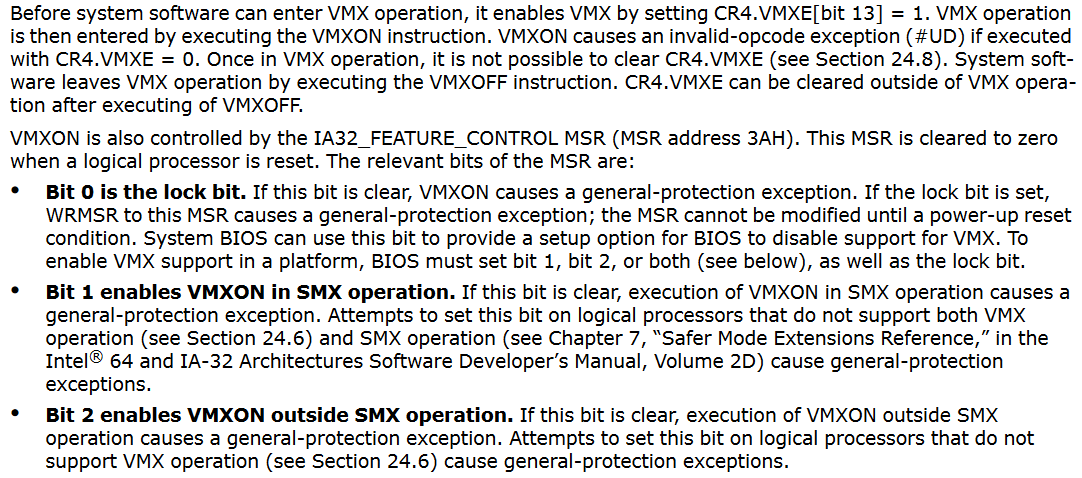
Figure: Enabling VMX Operation (Intel® 64 and IA-32 Architectures Software Developer’s Manual: 24.7 ENABLING AND ENTERING VMX OPERATION)
Rust Code for Enabling VMX Operation#
Here’s the Rust code to enable VMX operation, following the steps described above. The code sets the CR4.VMXE bit to enable VMX and configures the IA32_FEATURE_CONTROL MSR to lock the settings and allow VMXON outside SMX mode.
/// Enables VMX operation by setting the VMX-enable bit in CR4.
///
/// Sets the CR4_VMX_ENABLE_BIT to enable VMX operations, preparing the processor to enter VMX operation mode.
pub fn enable_vmx_operation() {
    const CR4_VMX_ENABLE_BIT: usize = 13;
    let mut cr4 = Cr4::read_raw();
    cr4.set_bit(CR4_VMX_ENABLE_BIT, true);
    unsafe { Cr4::write_raw(cr4) };
}

/// Adjusts the IA32_FEATURE_CONTROL MSR to set the lock bit and enable VMXON outside SMX if necessary.
///
/// # Returns
///
/// Returns `Ok(())` if the MSR is successfully adjusted, or a `HypervisorError` if the lock bit is set but VMXON outside SMX is disabled.
pub fn adjust_feature_control_msr() -> Result<(), HypervisorError> {
    const VMX_LOCK_BIT: u64 = 1 << 0;
    const VMXON_OUTSIDE_SMX: u64 = 1 << 2;

    let ia32_feature_control = unsafe { msr::rdmsr(msr::IA32_FEATURE_CONTROL) };

    if (ia32_feature_control & VMX_LOCK_BIT) == 0 {
        unsafe { msr::wrmsr(msr::IA32_FEATURE_CONTROL, VMXON_OUTSIDE_SMX | VMX_LOCK_BIT | ia32_feature_control) };
    } else if (ia32_feature_control & VMXON_OUTSIDE_SMX) == 0 {
        return Err(HypervisorError::VMXBIOSLock);
    }

    Ok(())
}
Explanation of the Rust Code#
- Function:
enable_vmx_operation():- Sets the VMX-enable bit in the
CR4register, preparing the processor to enter VMX operation mode.
- Sets the VMX-enable bit in the
- Function:
adjust_feature_control_msr():- Reads the
IA32_FEATURE_CONTROLMSR to determine if the lock bit is set. - If the lock bit is not set, sets the lock bit and the bit to enable VMXON outside SMX.
- If the lock bit is set but VMXON outside SMX is not enabled, returns an error indicating the BIOS lock issue.
- Reads the
Restrictions on VMX Operation#
To ensure that VMX operation works as intended, specific bits in the Control Registers (CR0 and CR4) must be set or cleared to particular values. VMXON will fail if any of these bits have unsupported values when the system is in virtualization mode. A general-protection exception will occur if one of these bits is ever set to an unsupported value while VMX operation is in progress. We need to consult the VMX capability MSRs IA32_VMX_CR0_FIXED0, IA32_VMX_CR0_FIXED1, IA32_VMX_CR4_FIXED0, and IA32_VMX_CR4_FIXED1 to determine which bits in the CR0 and CR4 registers are fixed and how they should be set.
CR0 and CR4 Restrictions#
- CR0: The manual specifies certain bits in CR0 that must be set to specific values. If any of these bits contain an unsupported value, the VMXON instruction will fail.
- CR4: Similar to CR0, specific bits in CR4 must also be set to particular values to ensure successful VMX operation.
VMX Capability MSRs#
- IA32_VMX_CR0_FIXED0: Indicates the bits in CR0 that must be set to 0.
- IA32_VMX_CR0_FIXED1: Indicates the bits in CR0 that must be set to 1.
- IA32_VMX_CR4_FIXED0: Indicates the bits in CR4 that must be set to 0.
- IA32_VMX_CR4_FIXED1: Indicates the bits in CR4 that must be set to 1.
Adjusting Control Registers in Rust#
To adjust the CR0 and CR4 registers for virtualization, we implement functions that ensure the mandatory bits are set and cleared appropriately. The set_cr0_bits() function sets the mandatory bits in CR0 while clearing the mandatory zero bits, and the set_cr4_bits() function does the same for CR4.
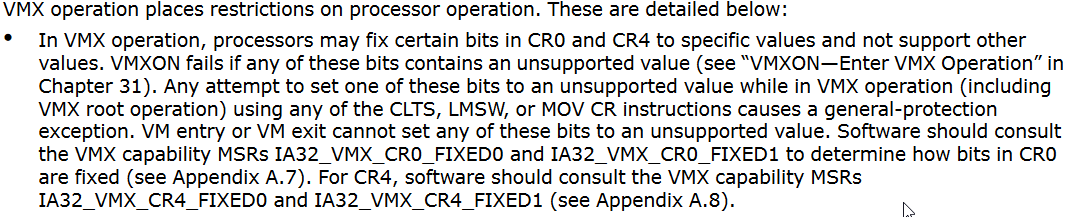
Figure: Restrictions on VMX Operation (Intel® 64 and IA-32 Architectures Software Developer’s Manual: 24.8 RESTRICTIONS ON VMX OPERATION)
The VMX capability MSRs IA32_VMX_CR0_FIXED0, IA32_VMX_CR0_FIXED1, IA32_VMX_CR4_FIXED0, and IA32_VMX_CR4_FIXED1 provide information about which bits in the CR0 and CR4 registers are fixed. These bits must be set or cleared to specific values for VMX operation.
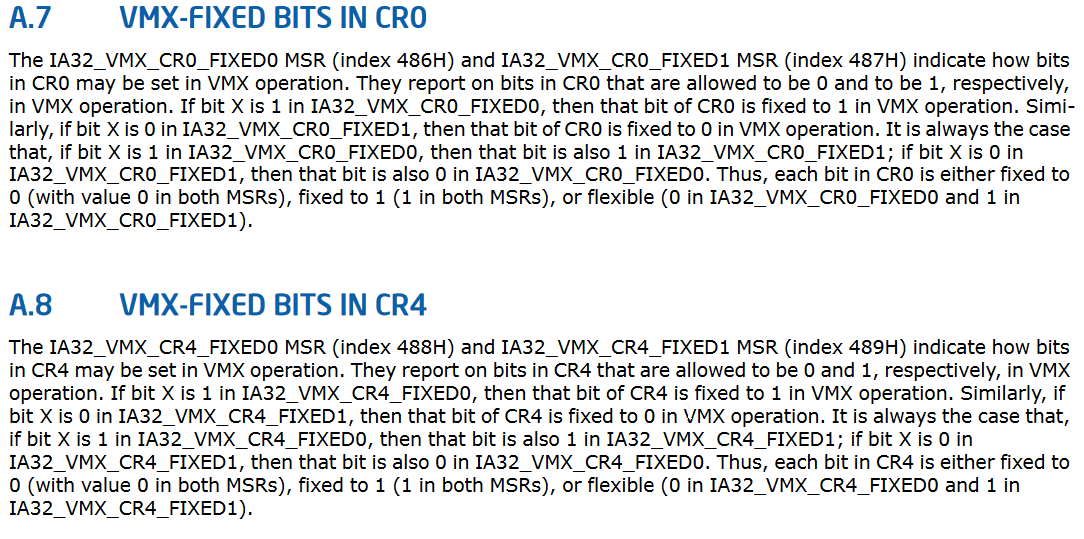
Figure: VMX-Fixed Bits in CR0 and CR4 (Intel® 64 and IA-32 Architectures Software Developer’s Manual: A.7 and A.8)
These functions read the values stored in the IA32_VMX_CR0_FIXED0, IA32_VMX_CR0_FIXED1, IA32_VMX_CR4_FIXED0, and IA32_VMX_CR4_FIXED1 Model-Specific Registers (MSRs) to determine which bits should be set and cleared.
The from_bits_truncate() function ensures that the bit values fit within the Cr0 and Cr4 types. The OR bitwise operator sets the mandatory bits, while the AND bitwise operator clears the mandatory zero bits. Finally, the resulting value is written back to the CR0 or CR4 register using the cr0_write() or cr4_write() functions.
Here’s the Rust code to adjust the control registers:
/// Sets and clears mandatory bits in CR0 as required for VMX operation.
///
/// Adjusts CR0 based on the fixed0 and fixed1 MSRs to ensure that all required bits for VMX operation are correctly set.
pub fn set_cr0_bits() {
    let ia32_vmx_cr0_fixed0 = unsafe { msr::rdmsr(msr::IA32_VMX_CR0_FIXED0) };
    let ia32_vmx_cr0_fixed1 = unsafe { msr::rdmsr(msr::IA32_VMX_CR0_FIXED1) };

    let mut cr0 = unsafe { controlregs::cr0() };

    cr0 |= controlregs::Cr0::from_bits_truncate(ia32_vmx_cr0_fixed0 as usize);
    cr0 &= controlregs::Cr0::from_bits_truncate(ia32_vmx_cr0_fixed1 as usize);

    unsafe { controlregs::cr0_write(cr0) };
}

/// Modifies CR4 to set and clear mandatory bits for VMX operation.
///
/// Uses the IA32_VMX_CR4_FIXED0 and IA32_VMX_CR4_FIXED1 MSRs to adjust CR4, ensuring the processor meets the requirements for VMX operation.
pub fn set_cr4_bits() {
    let ia32_vmx_cr4_fixed0 = unsafe { msr::rdmsr(msr::IA32_VMX_CR4_FIXED0) };
    let ia32_vmx_cr4_fixed1 = unsafe { msr::rdmsr(msr::IA32_VMX_CR4_FIXED1) };

    let mut cr4 = Cr4::read_raw();

    cr4 |= ia32_vmx_cr4_fixed0;
    cr4 &= ia32_vmx_cr4_fixed1;

    unsafe { Cr4::write_raw(cr4) };
}
Explanation of the Rust Code#
- Function:
set_cr0_bits():- Reads the values from the MSRs
IA32_VMX_CR0_FIXED0andIA32_VMX_CR0_FIXED1using therdmsrfunction. - Retrieves the current value of CR0.
- Adjusts the value of CR0:
- OR Operation (|=): Sets the bits that must be 1 according to
IA32_VMX_CR0_FIXED0. - AND Operation (&=): Clears the bits that must be 0 according to
IA32_VMX_CR0_FIXED1.
- OR Operation (|=): Sets the bits that must be 1 according to
- Writes the adjusted value back to CR0 using
cr0_write().
- Reads the values from the MSRs
- Function:
set_cr4_bits():- Similar to
set_cr0_bits(), this function reads the values from the MSRsIA32_VMX_CR4_FIXED0andIA32_VMX_CR4_FIXED1. - Retrieves the current value of CR4.
- Adjusts the value of CR4:
- OR Operation (|=): Sets the bits that must be 1 according to
IA32_VMX_CR4_FIXED0. - AND Operation (&=): Clears the bits that must be 0 according to
IA32_VMX_CR4_FIXED1.
- OR Operation (|=): Sets the bits that must be 1 according to
- Writes the adjusted value back to CR4 using
cr4_write().
- Similar to
VMXON Region#
Before allowing virtual machine extensions (VMX) activity, we must allocate a memory region called the VMXON Region, which will be used by the logical processor for VMX operation. The operand for the VMXON instruction is the physical address of this area.
The VMXON pointer must adhere to certain specifications, such as being 4-KByte aligned and not exceeding the processor’s physical address width. We must use a different region for each logical processor and write the VMCS revision identification (VMCS ID) to the VMXON region before VMXON is executed. Unpredictable behavior may emerge from accessing or altering the VMXON region of a logical processor between the execution of VMXON and VMXOFF.
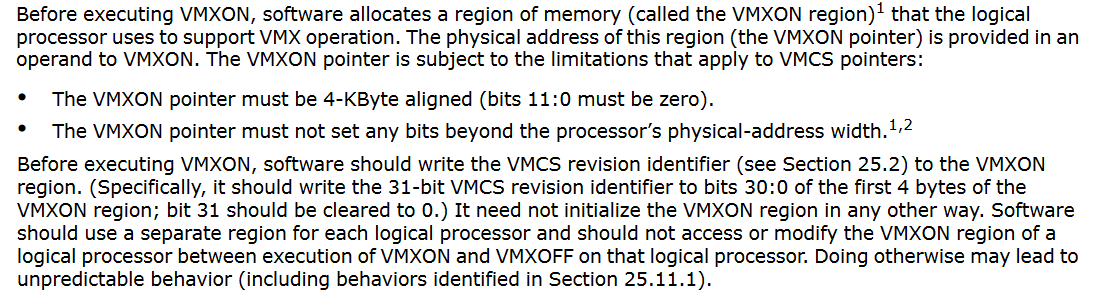
Figure: VMXON Region (Intel® 64 and IA-32 Architectures Software Developer’s Manual: 25.11.5 VMXON Region)
ASCII Diagram of VMXON Region#
+---------------------+
|   VMXON Region      |
|---------------------|
| Revision ID (u32)   |
|---------------------|
|    Data (bytes)     |
|    (4KB - 4)        |
+---------------------+
Rust Code for Managing VMXON Region#
This code defines a struct for the VMXON region and initializes it for VMX operations. It ensures the VMXON region is aligned and sets the necessary revision ID.
/// A representation of the VMXON region in memory.
///
/// The VMXON region is essential for enabling VMX operations on the CPU.
/// This structure offers methods for setting up the VMXON region, enabling VMX operations,
/// and performing related tasks.
///
/// Reference: Intel® 64 and IA-32 Architectures Software Developer's Manual: 25.11.5 VMXON Region
#[repr(C, align(4096))]
pub struct Vmxon {
    /// Revision ID required for VMXON.
    pub revision_id: u32,

    /// Data array constituting the rest of the VMXON region.
    pub data: [u8; BASE_PAGE_SIZE - 4],
}

impl Vmxon {
    /// Initializes the VMXON region.
    pub fn init(&mut self) {
        self.revision_id = rdmsr(msr::IA32_VMX_BASIC) as u32;
        self.revision_id.set_bit(31, false);
    }
}
Explanation of the Rust Code#
Struct:
Vmxon:- Represents the VMXON region in memory.
- It includes a
revision_idfield, which stores the revision ID required for VMXON. - The
dataarray constitutes the rest of the VMXON region, ensuring the entire structure is 4-KByte aligned.
Method:
init():- Initializes the VMXON region.
- Reads the VMCS revision ID from the
IA32_VMX_BASICMSR. - Clears the high bit (bit 31) of the revision ID, as specified by the Intel manual.
Full Rust Code for Enabling and Entering VMX Operation#
This full code example includes functions to initialize and manage the VMXON region, set the necessary control registers, and enable VMX operations on Intel CPUs.
//! Provides structures and functions for initializing and managing the VMXON region for VMX operations.
//!
//! This crate includes the `Vmxon` struct, which is essential for hypervisor development, enabling VMX operations on Intel CPUs.
//! It covers setting up the VMXON region, adjusting necessary control registers, and handling model-specific registers to meet Intel's virtualization requirements.

use {
    crate::{error::HypervisorError, intel::support::rdmsr},
    bitfield::BitMut,
    x86::{controlregs, current::paging::BASE_PAGE_SIZE, msr},
    x86_64::registers::control::Cr4,
};

/// A representation of the VMXON region in memory.
///
/// The VMXON region is essential for enabling VMX operations on the CPU.
/// This structure offers methods for setting up the VMXON region, enabling VMX operations,
/// and performing related tasks.
///
/// Reference: Intel® 64 and IA-32 Architectures Software Developer's Manual: 25.11.5 VMXON Region
#[repr(C, align(4096))]
pub struct Vmxon {
    /// Revision ID required for VMXON.
    pub revision_id: u32,

    /// Data array constituting the rest of the VMXON region.
    pub data: [u8; BASE_PAGE_SIZE - 4],
}

impl Vmxon {
    /// Initializes the VMXON region.
    pub fn init(&mut self) {
        self.revision_id = rdmsr(msr::IA32_VMX_BASIC) as u32;
        self.revision_id.set_bit(31, false);
    }

    /// Enables VMX operation by setting the VMX-enable bit in CR4.
    ///
    /// Sets the CR4_VMX_ENABLE_BIT to enable VMX operations, preparing the processor to enter VMX operation mode.
    pub fn enable_vmx_operation() {
        const CR4_VMX_ENABLE_BIT: usize = 13;
        let mut cr4 = Cr4::read_raw();
        cr4.set_bit(CR4_VMX_ENABLE_BIT, true);
        unsafe { Cr4::write_raw(cr4) };
    }

    /// Adjusts the IA32_FEATURE_CONTROL MSR to set the lock bit and enable VMXON outside SMX if necessary.
    ///
    /// # Returns
    ///
    /// Returns `Ok(())` if the MSR is successfully adjusted, or a `HypervisorError` if the lock bit is set but VMXON outside SMX is disabled.
    pub fn adjust_feature_control_msr() -> Result<(), HypervisorError> {
        const VMX_LOCK_BIT: u64 = 1 << 0;
        const VMXON_OUTSIDE_SMX: u64 = 1 << 2;

        let ia32_feature_control = unsafe { msr::rdmsr(msr::IA32_FEATURE_CONTROL) };

        if (ia32_feature_control & VMX_LOCK_BIT) == 0 {
            unsafe { msr::wrmsr(msr::IA32_FEATURE_CONTROL, VMXON_OUTSIDE_SMX | VMX_LOCK_BIT | ia32_feature_control) };
        } else if (ia32_feature_control & VMXON_OUTSIDE_SMX) == 0 {
            return Err(HypervisorError::VMXBIOSLock);
        }

        Ok(())
    }

    /// Sets and clears mandatory bits in CR0 as required for VMX operation.
    ///
    /// Adjusts CR0 based on the fixed0 and fixed1 MSRs to ensure that all required bits for VMX operation are correctly set.
    pub fn set_cr0_bits() {
        let ia32_vmx_cr0_fixed0 = unsafe { msr::rdmsr(msr::IA32_VMX_CR0_FIXED0) };
        let ia32_vmx_cr0_fixed1 = unsafe { msr::rdmsr(msr::IA32_VMX_CR0_FIXED1) };

        let mut cr0 = unsafe { controlregs::cr0() };

        cr0 |= controlregs::Cr0::from_bits_truncate(ia32_vmx_cr0_fixed0 as usize);
        cr0 &= controlregs::Cr0::from_bits_truncate(ia32_vmx_cr0_fixed1 as usize);

        unsafe { controlregs::cr0_write(cr0) };
    }

    /// Modifies CR4 to set and clear mandatory bits for VMX operation.
    ///
    /// Uses the IA32_VMX_CR4_FIXED0 and IA32_VMX_CR4_FIXED1 MSRs to adjust CR4, ensuring the processor meets the requirements for VMX operation.
    pub fn set_cr4_bits() {
        let ia32_vmx_cr4_fixed0 = unsafe { msr::rdmsr(msr::IA32_VMX_CR4_FIXED0) };
        let ia32_vmx_cr4_fixed1 = unsafe { msr::rdmsr(msr::IA32_VMX_CR4_FIXED1) };

        let mut cr4 = Cr4::read_raw();

        cr4 |= ia32_vmx_cr4_fixed0;
        cr4 &= ia32_vmx_cr4_fixed1;

        unsafe { Cr4::write_raw(cr4) };
    }
}
Executing VMXON#
Before we execute VMXON, we need to combine all the functions we have created to set up the VMXON region and configure the necessary control registers and MSRs. Here’s the Rust code to achieve this:
/// Activates the VMXON region to enable VMX operation.
///
/// Sets up the VMXON region and executes the VMXON instruction. This involves configuring control registers,
/// adjusting the IA32_FEATURE_CONTROL MSR, and validating the VMXON region's revision ID to ensure the CPU is ready
/// for VMX operation mode.
///
/// # Returns
///
/// Returns `Ok(())` on successful activation, or an `Err(HypervisorError)` if any step in the activation process fails.
pub fn activate_vmxon(&mut self) -> Result<(), HypervisorError> {
    trace!("Setting up VMXON region");
    self.setup_vmxon()?;
    trace!("VMXON region setup successfully!");

    trace!("Executing VMXON instruction");
    vmxon(&self.vmxon_region as *const _ as _);
    trace!("VMXON executed successfully!");

    Ok(())
}

/// Prepares the system for VMX operation by configuring necessary control registers and MSRs.
///
/// Ensures that the system meets all prerequisites for VMX operation as defined by Intel's specifications.
/// This includes enabling VMX operation through control register modifications, setting the lock bit in
/// IA32_FEATURE_CONTROL MSR, and adjusting mandatory CR0 and CR4 bits.
///
/// # Returns
///
/// Returns `Ok(())` if all configurations are successfully applied, or an `Err(HypervisorError)` if adjustments fail.
fn setup_vmxon(&mut self) -> Result<(), HypervisorError> {
    trace!("Enabling Virtual Machine Extensions (VMX)");
    Vmxon::enable_vmx_operation();
    trace!("VMX enabled");

    trace!("Adjusting IA32_FEATURE_CONTROL MSR");
    Vmxon::adjust_feature_control_msr()?;
    trace!("IA32_FEATURE_CONTROL MSR adjusted");

    trace!("Setting CR0 bits");
    Vmxon::set_cr0_bits();
    trace!("CR0 bits set");

    trace!("Setting CR4 bits");
    Vmxon::set_cr4_bits();
    trace!("CR4 bits set");

    Ok(())
}
Explanation of the Rust Code#
- Function:
activate_vmxon():- Calls
setup_vmxon()to configure all necessary control registers and MSRs. - Executes the
vmxoninstruction with the VMXON region’s physical address.
- Calls
- Function:
setup_vmxon():- Enables VMX operation by setting the VMX-enable bit in the
CR4register. - Adjusts the
IA32_FEATURE_CONTROLMSR to set the lock bit and enable VMXON outside SMX. - Sets and clears mandatory bits in the
CR0andCR4registers as required for VMX operation.
- Enables VMX operation by setting the VMX-enable bit in the
VMXON Instruction Convention#
The VMXON instruction updates flag registers to indicate the result of the operation. Here’s how it works for VMXON:
- Success: All flags (
CF,PF,AF,ZF,SF,OF) are cleared (set to0). - Failure:
- If the
CFflag is set to1, it indicates an error without a code. - If the
ZFflag is set to1, it indicates an error with a code.
- If the
VMsucceed:
    CF := 0;
    PF := 0;
    AF := 0;
    ZF := 0;
    SF := 0;
    OF := 0;

VMfailInvalid:
    CF := 1;
    PF := 0;
    AF := 0;
    ZF := 0;
    SF := 0;
    OF := 0;

VMfailValid:
    CF := 0;
    PF := 0;
    AF := 0;
    ZF := 1;
    SF := 0;
    OF := 0;
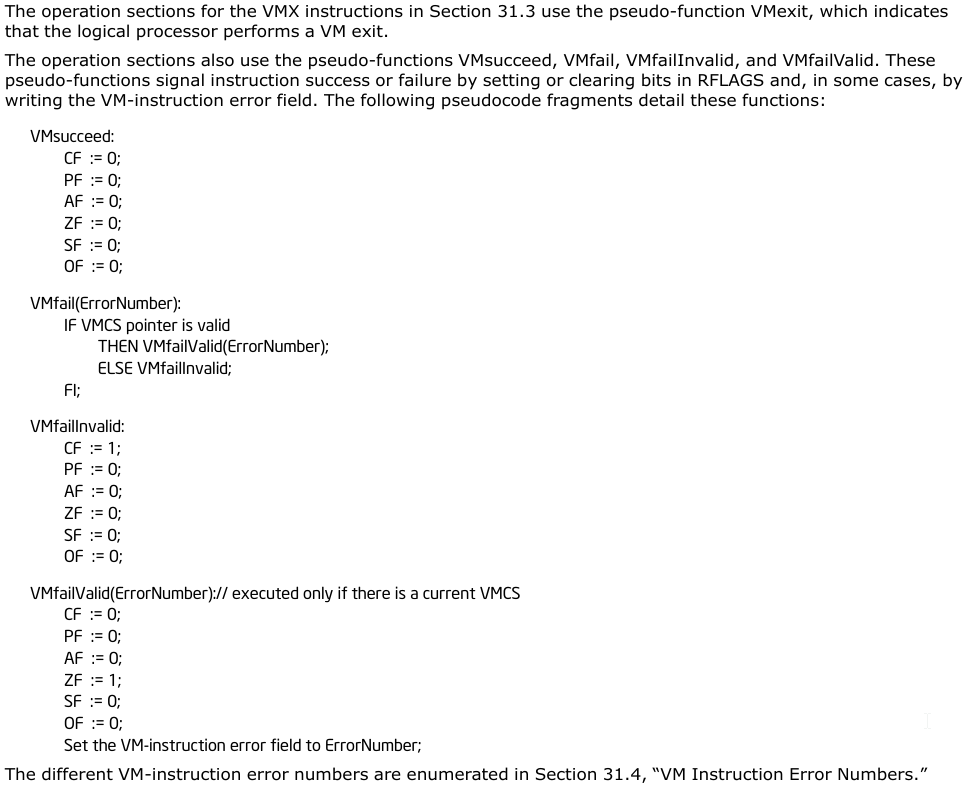
Figure: Conventions (Intel® 64 and IA-32 Architectures Software Developer’s Manual: 31.2 CONVENTIONS)
To execute the VMXON instruction, we pass the physical address of the VMXON region to it. The vmxon function takes a pointer to the VMXON region and initiates VMX operation mode.
VM Instruction Error Numbers#
For certain error conditions, the VM-instruction error field is loaded with an error number to indicate the source of the error. Here are some common error numbers related to VMXON:
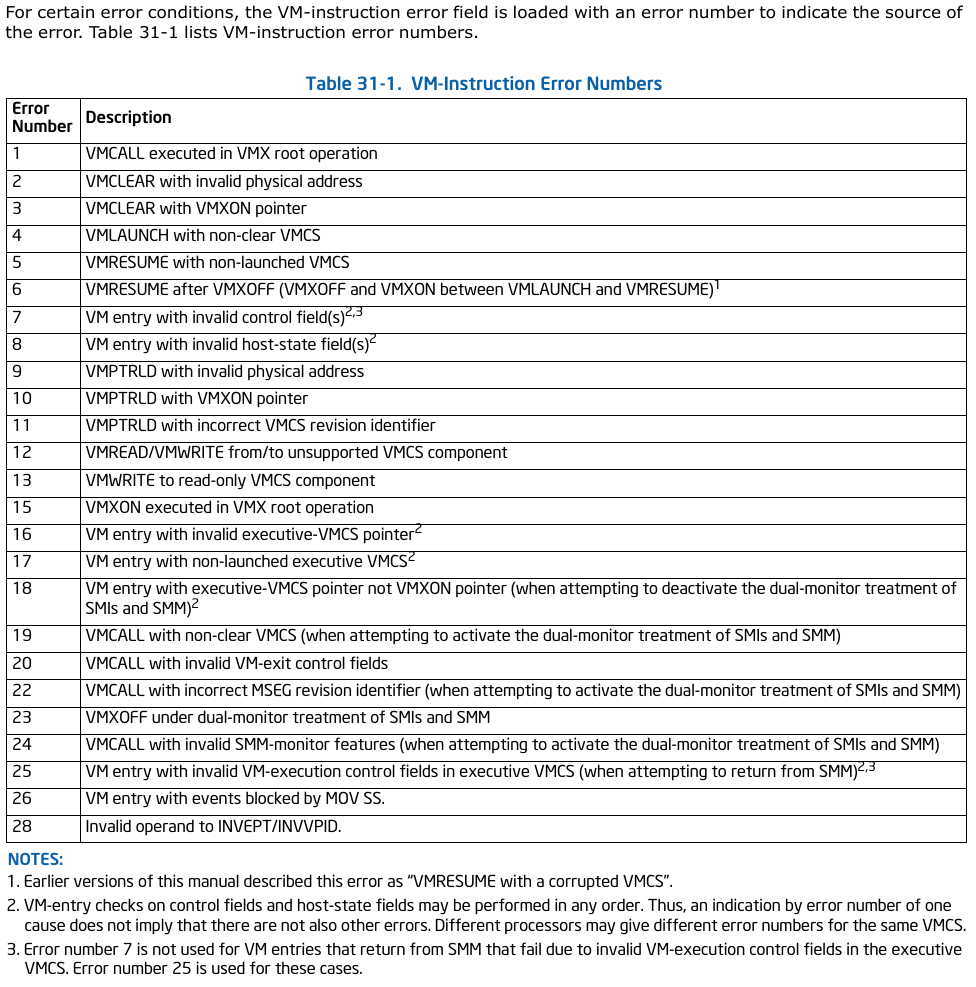
Figure: VM Instruction Error Numbers (Intel® 64 and IA-32 Architectures Software Developer’s Manual: 31.4 VM INSTRUCTION ERROR NUMBERS)
- 1: VMXON executed in VMX root operation.
- 14: VMXON executed in VMX root operation.
We can use these error numbers for detailed error handling. However, for simplicity, we can use .unwrap(), .expect(), or panic() and print a message if the vmxon function fails. Note that the vmx_capture_status function in the x86 crate already handles checking the VMXON instruction results for us. This function reads the relevant flags and returns appropriate error results based on the state of the flags.
fn vmx_capture_status() -> Result<()> {
    let flags = rflags::read();

    if flags.contains(RFlags::FLAGS_ZF) {
        Err(VmFail::VmFailValid)
    } else if flags.contains(RFlags::FLAGS_CF) {
        Err(VmFail::VmFailInvalid)
    } else {
        Ok(())
    }
}

/// Enable VMX operation.
///
/// `addr` specifies a 4KB-aligned physical address of VMXON region initialized
/// in accordance with Intel SDM, Volume 3C, Section 24.11.5.
///
/// # Safety
/// Needs CPL 0.
pub unsafe fn vmxon(addr: u64) -> Result<()> {
    asm!("vmxon ({0})", in(reg) &addr, options(att_syntax));
    vmx_capture_status()
}
Explanation of the Rust Code#
Function:
vmx_capture_status():- This function reads the current value of the processor’s flags register (RFLAGS) using
rflags::read(). - It checks the Zero Flag (ZF) and the Carry Flag (CF) to determine the result of the VMXON instruction.
- If the ZF is set, it returns
Err(VmFail::VmFailValid), indicating a valid VM fail. - If the CF is set, it returns
Err(VmFail::VmFailInvalid), indicating an invalid VM fail. - If neither flag is set, it returns
Ok(()), indicating success.
- This function reads the current value of the processor’s flags register (RFLAGS) using
Function:
vmxon():- This function enables VMX operation.
- It takes a 4KB-aligned physical address of the VMXON region as an argument.
- The function uses inline assembly (
asm!) to execute the VMXON instruction with the specified address. - After executing the VMXON instruction, it calls
vmx_capture_status()to check the result of the instruction and return the appropriate status. - The
unsafekeyword is used because this function performs low-level operations that require careful handling to avoid undefined behavior.
Conclusion#
In this first part of our series on hypervisor development in Rust, we’ve laid the groundwork for more advanced topics by exploring the basics of enabling VMX operation on Intel processors. We covered fundamental concepts and initial setup, preparing you for the next steps in hypervisor development.
Stay tuned for the next parts, where we will cover the basics and eventually dive into more advanced topics like hypervisor-assisted hooking, memory virtualization using Extended Page Tables (EPT), and Intel Processor Trace (PT). We will also explore setting up an environment to test this code, UEFI-based and kernel-based modules, and the essential concepts related to logical (virtual) processors and cores.
Join me as we continue to uncover the secrets of virtualization and its role in security research. Stay tuned for more!
Acknowledgments, References, and Motivation#
- memN0ps’ Matrix and Illusion Hypervisor Projects
- Daax’s 7 Days to Virtualization
- Sinaei’s Hypervisor From Scratch Tutorial Series
- Satoshi’s Hypervisor Development for Security Researchers and GitHub Projects
- OpenSecurityTraining2’s Architecture 2001: Intel x86-64 OS Internals
- Intel® 64 and IA-32 Architectures Software Developer Manuals
- AMD64 Architecture Programmer’s Manuals
- Secret Club’s How Anti-Cheats Detect System Emulation
- Maurice’s Detecting Hypervisor-assisted Hooking
- Joanna’s Pioneering the Blue Pill Hypervisor Concept
- Rust Programming Book
- Matthias’ AMD Hypervisors
- Alex’s SimpleVisor